Monday 13 February 2012

18. Word Processing


In the beginning, Word Processors were looked upon as the Devil’s work as they signalled the doom of the Typist.

Originally a Word Processor (WP) was an actual machine which produced stereotyped letters, automatically including information such as Names, Addresses, Home Towns etc.

Your first sight of letters produced in this manner probably came from the Reader’s Digest saying:-

Dear Mr Jones,
You are 1 of only 6,000 people selected in Barnsley to be entered into our prize draw for a chance to win £50,000.


These were very crude and badly presented but they allowed mass mailing to millions of people after producing only one letter. All the variables (shown in red above) were plucked from the database supporting the mailmerge.

With the introduction of the desktop PC in the 1980s, personal WP software was quickly developed which allowed secretaries and typists (and even me) to be able to produce professional looking documents quickly and easily.


This course is not intended to teach you to type but will introduce you to some of the features of which you may not be aware and to show you some of the keyboard shortcuts which make life simpler when producing documents.

When WPs were first introduced into my workplace in 1985, the typists did not like them and preferred to bang away on their IBM electric typewriters, produce carbon copies of their work and file the results away in cabinets.

One of the things they hated however was the boss who returned a six page document with the request to insert an extra paragraph on page 1 or change the names of the products about which he was writing. This always involved retyping the whole document.

Now comes the WP. Add a paragraph? – No Problem! The WP simply reformats and re-paginates. Change a product name? – No Problem! Simply search and replace and Bob’s your mother’s brother.

WPs quickly came into favour and replaced the typewriter for ever.

You can use a WP all the way from typing a simple document to fairly impressive Desk Top Publishing (DTP).

To the novice, all WPs do exactly the same thing, you just have to know which buttons to push.

Most users will only ever want to know how to type characters in upper and lower case, bold, underlined, and italics, or a combination of these. We will go over these functions including correct use of the shift key and some of the keyboard shortcuts which may be used.

We will learn how to introduce clipart or photographs and other graphics into documents, how to change font style and size, how to produce columns and one of the most neglected of items, the manual page break which allows correct repagination of documents when adding extra text or graphics.

We will learn how to delete text, copy and paste text, spell check (using also the brain), insert text, search and replace, reformat existing text, and insert tables. We will discuss more advanced features when we have mastered the above.

Starting your Word Processor

Click on the WP icon either on the Desktop or Start Menu.

Creating a Document

Your WP will automatically open a new blank document but.... there are several ways to open a new blank document depending upon which WP you are using.

Most have a New icon on the menu bar or..... Click on File > New

Choosing your font

When you begin typing the font will be that which you have chosen as your default when setting up the preferences for your WP. Change the font using the drop-down list.

Inserting Text

The flashing cursor is called the insertion point and is where any new data will appear.

Keying Text Using Word Wrap

WPs automatically break the text when they reach the right margin of the document so pressing Enter at the end of a line is unnecessary unless you wish to begin a new paragraph.

Do not use the Caps Lock key unless you wish to type in continuous capital letters. To begin a new sentence simply hold down the right or left shift key, type your initial letter then release the shift key.

Using Paragraph Breaks (Hard Returns)

Press the Enter key to insert a paragraph break, sometimes referred to as a hard return as the Enter key is in the same place as the Return key would have been on an electric typewriter. To separate paragraphs tap the Enter key twice. (We will learn how to properly format paragraphs later).

Overtyping or Inserting Text when amending a paragraph

This is achieved by pressing the Insert key on the keyboard. This is a toggle key and pressing it again reverses the process. The norm is typing in the Insert mode.

Insert Mode

As you type, the text is pushed to the right, making room for the new text. Word moves the text to new lines as necessary and reformats the pages to adjust to the additional information.

Overtype

Overtype mode stops the text from moving to the right as you type. The new text replaces, or types over, the existing text. This key is now disabled in MS Word.

Overtype mode should be avoided as you can easily be left with word obliterated by mistake or else not completely erased. To overtype a word or paragraph it is safer to highlight the text and simply re-type the wanted text in its place.

Deleting Text using the mouse and the Delete key. 

Position the cursor before the text to be deleted. Press the Delete key.

Deleting text using the mouse and the Destructive Backspace key

Position the cursor after the text to be deleted. Press the Backspace key.

Deleting whole words

Double-click on the word. Press the delete key.

Undoing a deletion

To undo a deletion, click on the Undo button on the Standard toolbar, or use the Edit menu as follows:

Click on the Edit menu. Click on Undo Delete Word.

Undoing an action

To undo an action, click on the Undo button on the Standard toolbar, or use the Edit menu as follows:

Click on the Edit menu. Click on the Undo command Tip: Another method of undoing an action is to use the Ctrl+Z keys.

Navigation Keys

It pays to learn the Navigation Keys to enable you to move around your documents quickly.

Somewhere on the right-hand side of your keyboard you will find the Home, End, Page Up, and Page Dn keys. You also have four arrow keys for moving your cursor up, down, left, and right.

Obviously the arrow keys move your cursor along lines of text or up and down the page. Used in conjunction with the Ctrl key they move the cursor a complete word left or right with the left or right arrow keys, or will put the cursor at the previous or next paragraph marker using the up or down arrow keys respectively.

From anywhere in a line of text, Home or End will take the cursor to the beginning or end of the line respectively.

Use either of these keys in conjunction with the shift key and it will highlight the text between the insertion point and the beginning or end of the line. The highlighted text may then be reformatted or deleted etc.

Use the Home or End keys in conjunction with the Ctrl key and you will jump to the beginning or end of the entire document.

The Page Up and Page Dn keys do what you think they would do by moving your cursor up or down by a page. This is however only a screen page so if you are viewing at, say, page width, it could take three clicks to position the cursor at the top of the next or previous page. Use either of these keys in conjunction with the Ctrl key and your cursor will be positioned at the top of the document page.

Non-Printing characters (spaces, tabs, paragraph breaks etc.)

A little used menu item is a symbol which looks a little like this Л. It appears on the menu bar in many WPs and it reveals all non printing characters on the page such as spaces, paragraph marks, tabs etc. It can be of immense help when formatting a page or when trying to find out why characters are appearing where they shouldn’t be.

Paragraph Justification

Justification is the method which tells the WP how you wish your text to look in the finished document. Left justified means that the text in a paragraph will line up with the left margin and the right hand end of the lines will end at a completed word after which the text will break onto the next line.

Right justified ensures that the text lines up at the right margin.

Fully justified (hated by trained typists) will mean that both left and right edges of the text are lined up like in a newspaper column. This results in uneven spaces between the words and can cause the text to look untidy.

Formatting Text 

Any changes to format styles will start from the insertion point and apply to new text only. To change existing text it is important to highlight it and follow the shortcuts or keystrokes below.

Applying Font Styles to text already typed using shortcut key combinations.  Applying a font style with the Bold, Italic, and Underline buttons

Select some text. (Highlight the text) Click on the Italic button. (The shortcut key for italicising is Ctrl+I.) Click on the Bold button. (The shortcut for bold text is Ctrl+B.) Click on the Underline button. (The shortcut for underlining is Ctrl+U.) The same shortcuts apply to undo formatting. The font style of an individual word may also be altered by placing the cursor within the word, clicking once, then choosing the attribute (bold, underline etc.) from the toolbar. Tip: You can also format font styles as you type. Press the Bold, Italic or Underline button first (or use the keystroke shortcuts) then type your text. It will immediately pick up the formatting change.

Cut and Paste

To move blocks of text around you can cut from one location and paste in another. Highlight the whole of a paragraph. Now cut it by using the menu icon or Ctrl-X or right-click and choose cut.

Position the insert point where the paragraph is to be moved to and paste using the menu icon, Ctrl+V, or right click and choose paste.

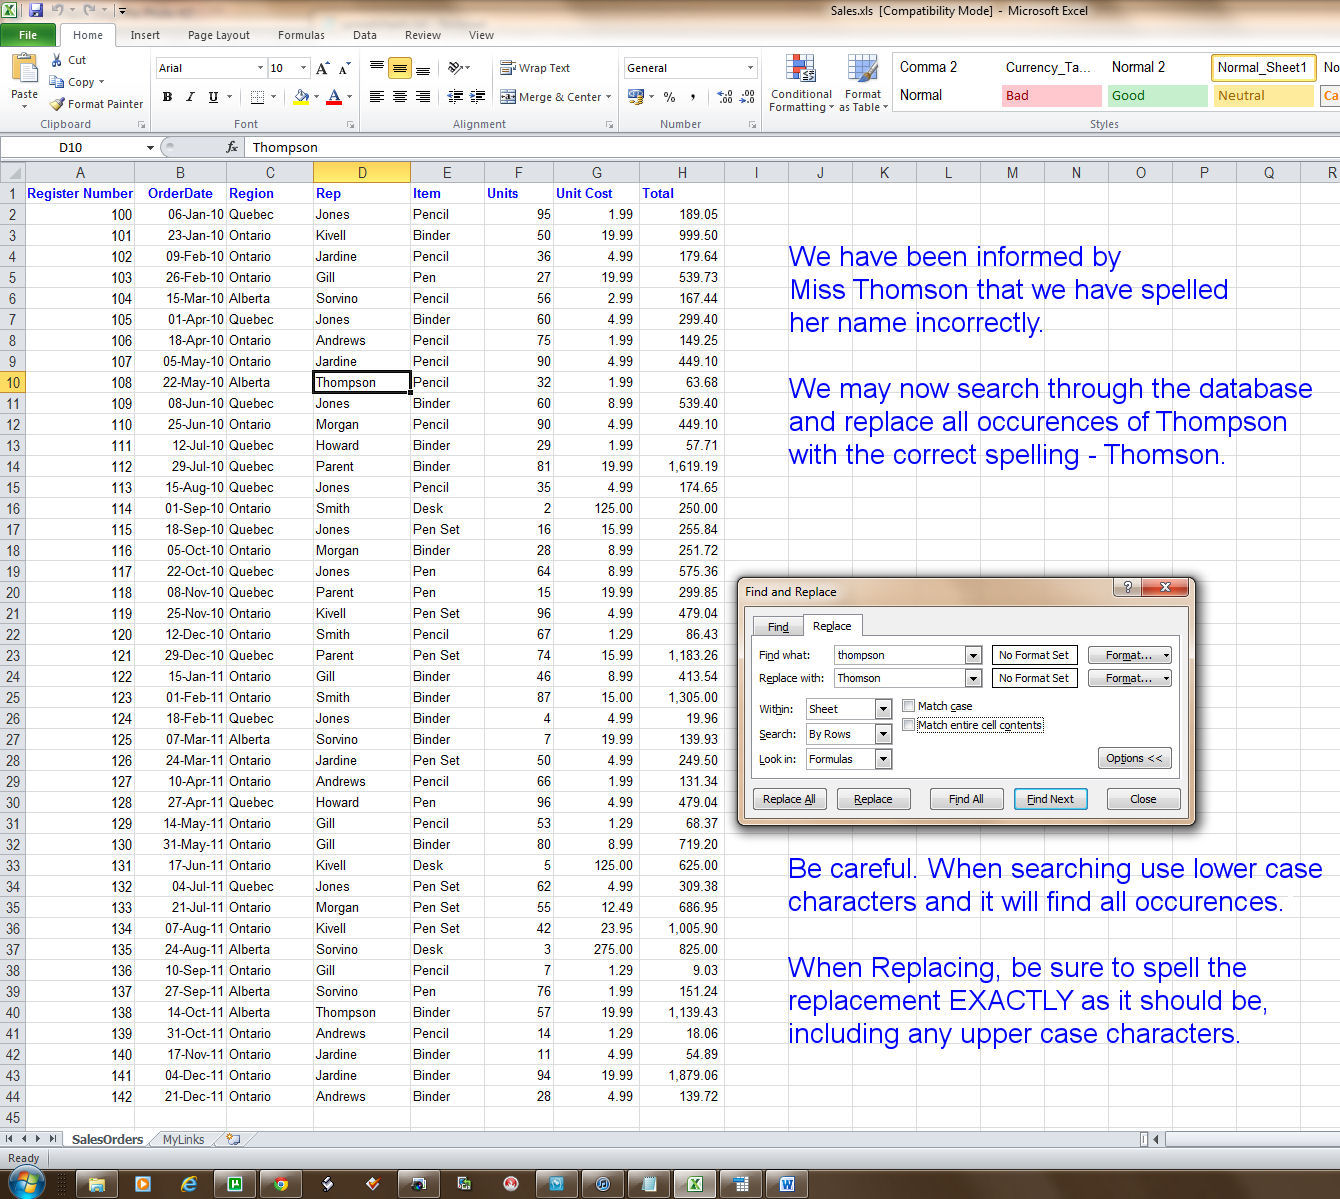
Search or Search and Replace

Issue the Find command Ctrl-F. Type the required word or character in the dialogue box and click on the search button. Each occurrence of the word will be found.

If you wish to replace this word with another, type the new word in the replace box and the word will be replaced either each time you agree to the change or throughout the entire document.

Tabs are something often ignored but which will help immensely when creating a document especially one containing figures. Above you see the ruler which may be shown or hidden according to choice and it is on this where one would set tabs.

Above you may see the two “Ls” which indicate that two left adjusted tabs are set. Other types available are right adjusted, centred, and decimal point.

Graphics are very useful in documents for illustrating points or for simple decoration. Graphics is the term used for any pictorial object which you place within your document, so a graphic could be a scan of your signature, a logo, a photograph, or simply a piece of clipart used for illustration.

Our two main WP applications, MS Word and Open Office Writer handle graphics in completely different ways.

MS Word is the worst graphics handler I have ever used. I have been using Word since 1997 and still do not understand why it does some of the things it does. When you insert a graphic it is fixed on the page and you then have to say how you want text wrapping to perform before you can move the graphic on the page.

On the other hand Open Office immediately lets you resize and move your graphic anywhere and you can decide how to text wrap afterwards.

Page Formatting is the act of setting up items which will affect the whole page such as orientation, margins, page size, headers and footers etc.

Page orientation changes the page layout from the normal portrait to landscape and vice versa. This is useful when printing documents containing maps or wide photographs etc. Care should be taken when changing orientation within a document so as not to leave blank pages before or after the change.

Margins denote the area on a page between which the text will be restricted. They do not affect where you may place graphics. This is useful when typing on a page which will contain photographs down one side and text the other. Margin widths may be latered to make the text area larger or smaller but if made too narrow you may find that your printer will not print everything as most printers have a limit on how close to the edge of the paper they will print.

Page size is simply a function of what paper you are using. We normally use A4 but if you had a supply of American Letter sized paper (8.5” x 11”) you could change your paper size in the document and your WP application will alter your print layout accordingly. It is also necessary to change the page size if you receive a document from somebody whose paper size was different when they prepared the document, and then passed it on for addition or amendment. American documents tend to use “Letter” sized paper which is wider and shorter that our standard A4.

Headers and footers are very useful and can make a report or story very professional in appearance.

Within headers and footers, page numbering should always be used on longish documents both as an aid to keep pages in order and to ensure completeness.

Again Word and Open Office have different ways of handling these items, Open Office being the easier and more straight forward.

By default most WPs will give you left-, centre-, and right-adjusted tabs in your header and footer.

In the footer shown below, we have included the Author’s name, the date of preparation, and the page numbers.

The date and page-numbers have been created using field values and will adjust themselves as required.

Finally, when typing a document of more than one page ensure that you maintain the correct pagination by careful use of the Hard Page Break. 

Let us say that you start a document by typing only the title and author on the first page. The way to start the second page is to hold down the Ctrl key and hit Enter. This enters a Hard Page Break which is a non printing character and which causes you to begin typing on the next page. Had you simply hit the enter key enough times to get you onto the next page then you would have entered several non printing characters, all the way to the bottom of the page. Now suppose you wish to go back to the first page and type a short paragraph under the author's name. As you type you will obviously push down any characters after the insertion point. If you have typed enough "Enters" to get you onto the next page, all of these would be pushed down, some onto the next page, which in turn will push down the text at the top of the second page and so on. 

The rule is:- when you have finished typing on a page and wish to start a new one - use a Hard Page Break.

An article on more advanced word processing will be posted later.


----------------------------------

Friday 27 January 2012

17. Using a Spreadsheet as a Simple Database.


In addition to using spreadsheets for their original purpose of inter-related calculations, they serve as simple databases by their very nature of structured cell contents.

Many people use their Spreadsheet application as a convenient method of creating lists, in effect a mini database. This is a perfectly acceptable use of a spreadsheet especially when the more advanced features of a genuine database application (e.g. MS Access) are not required.

In the form we would use, i.e. one sheet with a table of values which does not relate to other sheets, it is called a FLAT FILE DATABASE. Strictly, a flat file database should consist of nothing but data. More broadly, the term refers to any database which exists in a single file in the form of rows and columns, with no relationships or links between records and fields except the table structure.

As we work through these examples we will use both Microsoft Excel 2010, and Open Office Calc. The latter works in a very similar manner to Excel 2003 so this tutorial should cover most spreadsheet types currently in use by most people. A few points to begin:-

All Spreadsheet applications work in the same way and look similar.

The sheet is made up of cells, rows and columns and into each cell can be entered data in the form of text or numbers.

Just like in a Word Processor, the text may be formatted in type, size, or colour etc.

Numbers may also be formatted in order to display them with or without decimal places, as dates, as percentages etc.

The main reason for the existence of Spreadsheets is for the manipulation and calculation of numbers.
This is achieved with the use of formulas in the cells.

We will leave formulas, calculations, and interactive number manipulation for another time and concentrate on simple database use.

For a successful database you should observe the following advice:-

Each cell should contain the smallest possible data element. For instance if you are storing a person’s name, use one cell for the first name and another cell for the second name. For the same reason split the details of an address into as many smaller parts as possible so that later you could search or sort by city, state/region , by post code or even by country if you are maintaining an international list.

Lists should not contain blank rows or columns within the data. This can cause problems when later sorting your data.

Ensure that cells bordering your list are blank.

The top row of your data will contain the headers of each column. These are called field names.

Below we have a very simple spreadsheet showing sales by representative, in which area, and the value of each sale.

We are going to see how easy it is to sort the data using the various field names.

Please click on any of the graphics below to view them full size.
Click on the white X just to the right of the enlarged graphics to return to the Blog.

The two spreadsheets side by side.
On the left, Microsoft Excel 2010, on the right, Open Office Calc.
In blue are the column headings/field names.
As you can see, initially the two sheets look slightly different so we will tidy them up for appearance sake.

On the left of the above screen shot is the spreadsheet (ss) from Open Office and on the right is the ss from MS Excel.

The Excel sheet looks neater and less confusing because of the alignment in the cells. All the text cells are left-adjusted and all numeric cells are right-adjusted. This is what might be called standard but you can have your cells aligned any way you want but I would advise consistency.

The Open Office ss has had  the Unit Cost figures changed to right-aligned for appearance
The main reason for storing data in a Flat File Database is so that the database may be consulted at a later date to see (e.g.) who has paid their subs in a club, where items are stored in a physical filing system such as boxes or shelves, where you can find a particular piece of music within your own storage system whether it be in the form of computer files or on CD etc. In order to be able to do that you need to be able to search the database for individual items (e.g. Let It Be by The Beatles) or items of the same or similar genre (e.g. show me all the rock songs I have by Pink Floyd).

This highlights two essential functions namely search, and sort.

At this point I must re-emphasise that a database is only as good as the information it contains and the way the fields are set up. Be as detailed as you can. For instance if you are setting up a database for your music collection it would be no good having a field containing both artist and song title as you could only use this for searching not sorting. By keeping these separate we could sort the collection by song title and then see all the different people we have singing it within the collection. This is just one example. Keep each field containing one piece of information in order to keep the database flexible.

The following are examples of searching through a database.

A simple Search in Open Office
The same Search in Excel
As you can see the methods are almost identical in each ss type.

This is an example of Search and Replace.

This is Search and Replace in Excel. It is almost identical in Open Office.
As it says in the graphic be careful when replacing words to be sure to type in exactly how the new word should look. Also be extra careful if using the "Replace All" function. Say you have stored the names of books and authors and have discovered that you have spelled an author named Jonson as Johnson. You could do a search and replace on this but if you choose Replace All you could find yourself changing other words or book titles which were actually spelled correctly.

Now moving on to the Sort function.

First of all highlight all the data in the database. You must highlight ALL of the database, not just the columns you wish to sort by, otherwise records will become jumbled (a record is one row of the database). There are many ways to highlight the cells. If you click on the first cell (in this case A1), hold down the shift key, then click on the last, (H44), those two cells and all of the intervening cells will be highlighted. Another way is to click on the first cell in the range, hold down the shift key, press on the down-cursor-movement-key until you reach the last cell in the column, press on the right-cursor-movement-key until all the columns are highlighted, then release the shift key. There are other ways but you can find them by experimentation. This applies to both Spreadsheet types.

Starting with Excel. This version of Excel has far more functionality on the menu ribbon so looks different from the process in Open Office or Excel 2003. With all the database highlighted, click on the Data menu item (if not already chosen),

then click on the Sort icon.

This in turn throws up another dialogue box and this is the essential core to sorting in Excel. Now in this exercise we are going to check on the activities of the Reps, and then sort their sales by Item. When we set up the database we gave each column a heading and when the database was highlighted the headings were included. In the dialogue box we first ensure that the "My data has headers" box is ticked. Now the "first level" sort is by Rep so we select this from the drop down box in the first line. Click on Add Level and in the second line choose Item.


Finally click on OK and the list is almost instantly resorted in the manner requested.


A glance through the list will now show the Reps sorted alphabetically, and the Items they have sold also sorted alphabetically against each Rep.

Moving on to Open Office Calc. Start off by highlighting the whole of the database including the column headers. The actions differ from Excel 2010 and are very similar to Excel 2003 and earlier. Click on Data on the menu and choose Sort.


A dialogue box will open showing three lines of "sort levels".


In the first line choose Rep and in the second line choose Item. Click on OK and the list is almost instantly resorted in the manner requested.


A glance through the list will now show the Reps sorted alphabetically, and the Items they have sold also sorted alphabetically against each Rep.

The above Sorting exercises were quite simple to carry out and were carried out on very small databases with only a few field and records. It is no more difficult on larger databases as long as you follow the advice given above, especially with reference to setting up the databases initially.

The database could easily have contained records of a collection of CDs and where we chose Rep our chosen field could have been Singer and instead of Item it could have been Album. We would have ended up with a list of Albums by Singer enabling selection of an evening's entertainment.

The choices and uses of Flat Field Databases are endless.

----------------------------------


Thursday 19 January 2012

16. How to load books onto a Kindle


Most people only ever download books for their Kindles from Amazon using either the free or paid-for lists.

There are, however, many sources of books for the Kindle. Books are made available by various people or societies, and they may usually be downloaded for free.

Users of these services should satisfy themselves that they are happy to download these books from the Internet.

As discussed on many occassions throughout this series of Blogs, all computer files consist of a name, followed by a dot, followed by another set of characters known as the extension. Examples include winword.exe, A Tale of Two Cities.doc, Dracula.prc. The extensions are exe, doc, and prc respectively.

Kindle files from Amazon have an extension of azw and they are usually the PROTECTED files downloaded from Amazon and which may only be used on Kindles by the registered owner of the files. A good idea is if you and your partner have Kindles, and each have an installation of Kindle on your iPhones, iPads, PCs, or Android Tablets, it pays to have them all registered to ONE Amazon Account Holder so as to make all the protected titles which you purchase available to each Kindle or installation.

There are ebooks with extensions other than azw which are compatible with and which may be read on Kindles. (I will now refer to Kindles and mean physical Kindle ebook readers or any other Kindle installation on a phone or PC).

Files with the extension mobi or prc are perfectly compatible with Kindles and may be downloaded from various sources. A good source for out-of-copyright books and classics is The Guttenburg Project. Here hundreds of volunteers work to make thousands of books available for either reading on line or downloading to ebook readers. Go to their website and see what is available and you may even volunteer to become a proof reader and help with the project. There are many other sources, some of which may not be legal, where users share files and allow their downloading.

All your Kindle-compatible books should be stored in logically named folders, as previously discussed, to allow for easy finding at a later date. An excellent way to do this (and you can transfer books to your Kindle directly) is to download and install the free software "Calibre e-book Management". This will allow you to store and organise your ebooks of any variety and load them to your device. Read on for the manual method.

Amazon allow the reading of Kindle books on your PC or other devices via their downloadable applications such as Kindle for PC, Kindle for iPad etc. If you log on to the Amazon web site and navigate to the Kindle section you will be able to download these free of charge. Once downloaded they need to be registered on first use using your standard Amazon account before you can use them.

Having downloaded the books from your chosen source, or received them from a friend on a disc or memory stick, the method of transferring them to your Kindle ebook reader is as follows. (To read them on Kindle for PC you may simply double click on the downloaded files and they will open automatically).

First of all connect your Kindle to your PC using the USB cable provided.

Open Windows Explorer and locate the folder containing your downloaded Kindle files. If you have installed Kindle for PC (which you should do) all the files will appear with a little blue book icon at the start of each file.

Kindle Folders
Click on these pictures for a larger view.

Next locate the Kindle on the left-hand side of Explorer.

The Kindle in Windows Explorer
Click on the arrow symbol (or the + sign in Windows XP) to reveal the sub-folders on the Kindle. Leave this view expanded.

The expanded view of the Kindle showing its folders.
Go back to the folder containing the Kindle files and then drag any of the files which you wish to read on the Kindle across into the DOCUMENTS folder on the Kindle. If you can't drag and drop then click on a Kindle file, right-click on it, select Copy from the menu, right-click on the Documents folder on the Kindle and select Paste. You may do this with one file at a time or by selecting multiple files then begin the same copy and paste process by right-clicking on any of the highlighted files. Copy and pasting of multiple files is explained in post 5 of this blog, "5. Windows Explorer".

Selected files ready for transfer.
Right click on the documents folder and select Paste to complete the transfer.
The three files safely transferred.

When you have finished copying files onto the Kindle, right-click on the Kindle in Explorer and select Eject. This will ensure that any copying is completed and then make the Kindle available for reading etc. Of course you may leave it connected to the PC if you wish to complete the charging of the battery.

Complete the process by right clicking on the Kindle and select Eject.
Above I have referred to the transferring of files whereas in actual fact they are simply being copied. Knowing this it is perfectly safe to delete any books from your Kindle which you may have read as the originals remain on your PC. Any books you buy from Amazon are also stored on their server and may be freely downloaded to your registered Kindles as often as you require.

--------------------------

Monday 16 January 2012

15. How to create a new disk partition


Partitioning is the act or practice of dividing the storage space of a hard disk drive into separate data areas known as partitions.

The reasons for creating multi partitions on a Hard Disk Drive (HDD) usually surround grouping materials for neatness or security. Neatness can be solved far more easily with folders but security is best dealt with by partitioning the disk.

Your C: drive on your PC nearly always contains the Operating System and if anything goes wrong with it you may have to format the HDD with the result that all data will be lost. By creating a second partition you can move all your data (we are talking here of files, folders etc. created by a running program, or else downloaded or otherwise copied on to the PC) onto the second partition which will be unaffected by a format of the system disk.

For the purpose of this exercise we are going to use Easus Partition Master as it will cover operating systems which will not allow the resizing of current partitions on HDDs. I say this because Windows 7 will allow limited movement on partition sizes.

Upon starting the application we view the current situation. The C: drive can be seen and shows that it is a single usable partition of about 218GB. The other drive shown is a USB memory stick.


To begin we select this partition by simply clicking on it.


Next, right click on the highlighted area, and choose Resize/Move Partition.


Then using the right-hand slider,


drag the divider to the left until the sizes of the partitions are as wanted. Here I have kept the C: drive at about 100GB (Windows 7 can use up a lot of space) and leaving the remainder as free space. Click on OK and the main screen reappears but now showing the pending operation.


To continue select General, then Apply Changes.


Confirm that you wish to continue, read the warning that the PC will be rebooted and click on Yes. This is a major operation so there is a lot of work to do as the new partition is created. All the data and programs on the disk will be shunted into one area and as the PC cannot move data which is in use it needs to do this with Windows disabled.


The PC will reboot and the work commences. This could take some time depending upon the amount currently stored on the drive. When all operations are completed the PC reboots again and returns control to you.

Examine the drives via Windows Explorer and you will see the new reduced size of the C: drive.


The free space now created is not visible to us as it is just a dead space on the main drive and needs to be prepared for use. If we look in Windows Explorer we can see that drive C: is now reduced to about 100GB but that the space we freed off does not appear.

In order to be able to use this space it must be formatted.

Click on Start > Control Panel > Administrative Tools > Double Click on Computer Management.

This is a tricky area of your PC and you should not fiddle with anything you do not understand. 

On the left panel under Storage, click on Disk Management to expand the graphical display of the disks currently in or attached to your PC.


At the top of the page is a list of the drives in or attached to your PC and below is the actual graphical display which is easier to understand as it shows here which physical disks have been partitioned or divided into smaller chunks.

Disk 0 is the one of interest to us as it shows how the main fixed Hard Disk Drive (HDD) inside the PC has been partitioned. We have a Recovery Partition which would be used by an engineer to reinstall the system, a Reserved Area used by the system, the original System Area containing Windows and any installed software, and finally the area of unallocated space which we have just created and from which we will create the Data area.

Right click on the unallocated space, and choose New Simple Volume.


Accept the defaults on the next two dialogue boxes, then on the next box note the allocated drive letter. You should try to make this next in alphabetical order to the C: drive, or as close as possible, so if you still have removable drives plugged in which are using up drive letters, unplug them, click Back, then Next again in order to refresh the choices. Here we have D: as the selected drive letter which is what we want.


Click Next then select a Volume Name. We have chosen Data as the name for this new volume (Partition). Click Next after typing the Volume Label.


Click Finish on the confirmation dialogue box and return to the Computer Management  screen. Here you will observe drive D: being formatted, and as we selected Quick Format this will not take too long.

Now revisit the Windows Explorer screen to view the finished result and the PC shows that it has two HDDs of the sizes we stipulated during the Resize/Move operation.


To complete the process you may now move any data files from the C: drive to the D: drive and continue to use the PC as normal. You should use the drive as described in previous posts and keep your data in folders.

------------------------------

Tuesday 3 January 2012

14. A History of Windows

There was a time, not so long ago, when computer software (and the programmers who wrote it) commanded no respect at all. In an age when we regularly pay tens or even hundreds of pounds for programs to use on our PCs, this may seem hard to believe (unless you were involved in the business yourself, of course!), but it’s true.

We’re going back a few decades to a time when computers had to be designed and built to order, and could easily fill a room, and the companies and organisations doing the buying would often be incensed at the suggestion they should pay for the software. Surely, they would argue, it’s just a fiddly little detail compared to this roomful of gadgetry? We can’t even see it! Indeed, many companies in the computer business were accustomed to burying the price of developing the software among other ‘incidentals’ to avoid any drawn-out wrangling.

Times have certainly changed, and to a large extent that’s due to Microsoft. As a new and tiny company, Microsoft was asked to write software for the then-enormous IBM. Someone at IBM had had a peculiar idea that if they designed a small ‘personal computer’, they might sell a few, so they half-heartedly set about it. True to the feeling of the day, the software was regarded as a fiddly detail, so they got lil ole Microsoft to supply it cheaply. So unconcerned were they about the software that they even allowed Microsoft to retain all rights to it.

Disappointingly for IBM, this ‘personal computer’ was unexpectedly popular, but way too expensive. So countless other companies started producing their own much cheaper ‘PCs’, sidelining IBM, but they had to licence Microsoft’s software (named ‘MS-DOS’) to make them work.

The rest, as they say, is history. The PC became a purely-functional item, and what everyone cared about – and would willingly pay for – was the software that made it easy, friendly and capable. Of course, the software wasn’t really any of those things to begin with, but successive versions of Windows have gradually improved matters.

If you’ve ever wondered how we got from the dull days of MS-DOS to the glossiness of Windows 7 – or you just fancy a trip down Memory Lane – here’s a web page you’ll find interesting:

http://windows.microsoft.com/en-gb/windows/history

It’s a short history of the various versions of Windows, with pictures and brief explanations of how each version built on the last. It’s written by Microsoft itself, so, for example, the article celebrates the innovations of Windows Me while conveniently overlooking the fact that it was astoundingly unreliable, but it’s an easy, friendly and informative read.