Wednesday, 29 April 2015

80. Ten tips for working in Windows 8.1

No matter how you use Windows 8.1 — on a desktop with mouse and keyboard or via the touchscreen — there are some ways to make it easier and more efficient to use. Following are ten tips for getting the most out of Windows 8.1.


1. Use Search to start applications.
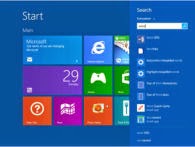
There’s no need to browse the Apps list to find a particular program, and no need to remember what category it’s in. To start an application, display the Start screen (pressing the Windows key is one way) and then type the first few letters of the application’s name. In the search results that appear, click the application.

 
2. Reorganize the Start screen.
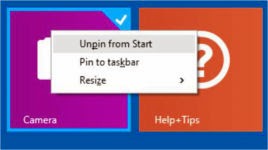

The Start screen contains tiles for many applications, mainly the ones that come free with Windows. These shortcuts are merely suggestions, though; you aren’t bound to any of them. Removing a tile from the Start screen doesn’t uninstall the application, and you can still access that application from the Apps list any time you want it.

In short, don’t be afraid to remove tiles from the Start screen and replace them with tiles for the applications that you actually use on a regular basis. You can always re-pin any applications there that you end up using more than you thought.

To remove a tile, right-click the tile and choose Unpin from Start. Notice that you’re not deleting the application. You are just releasing it from being represented on the Start screen.

 
3. Pin shortcuts to the taskbar.
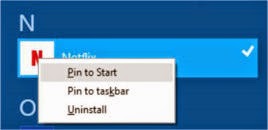

You might appreciate that Windows lets you pin shortcuts to the desktop’s taskbar. You could pin all your favorite apps there, and avoid the Start screen altogether 90 percent of the time. Pinned shortcuts on the taskbar appear on the left side, just to the right of the Start button. By default, the taskbar has two pinned shortcuts: Internet Explorer and File Explorer.

There’s a Pin to Taskbar command on the right-click menu for an app. You can use that to pin any application to the Start screen. You can even pin Windows 8-style applications that don’t run on the desktop; when you run one of those, Windows switches to full-screen view for that application.

 
4. Make icons and text larger. 
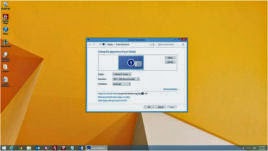
An LCD screen looks best at its highest resolution (its native resolution), but with today’s high-res screens, the highest resolution is pretty darned high. That means that the text and icons on the screen may be very tiny. Unless you have great vision, and just happen to like everything being small, that can be a problem.

For example, this screen is in 1920 x 1080 resolution and uses the default size for text and icons (Smaller). So tiny!

To change the icon and text size without changing the resolution, right-click the desktop and choose Screen Resolution. Click the Make Text and Other Items Larger or Smaller hyperlink near the bottom of the window. In the Change the Size of All Items area, choose the desired size: Smaller, Medium, or Larger.

 
5. Switch between programs quickly.


When you are running multiple applications, there are lots of different ways to switch among them:

Hold down the Alt key and press and release the Tab key. Each time you do so, a different application becomes active on the bar that appears in the center of the screen. When the item you want is highlighted, release the Alt key to make that window or application active.

If you’re viewing the desktop, click the application’s icon on the taskbar.

To switch among Windows 8 style apps, point the mouse pointer to the top left corner of the screen. A thumbnail of the last-used Windows 8 app appears. Click it to switch to it, or move the mouse downward to see a bar containing thumbnails of all open Windows 8 apps, and then click the one you want. If nothing happens when you point at the upper-right corner of the screen, no Windows 8 apps are open.

 
6. Right-click the Start button.
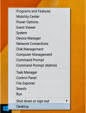

From the desktop, right-click the Start button, and a shortcut menu appears. On this shortcut menu are links to almost every utility program you might ever want to access in Windows, including Control Panel, Device Manager, Computer Management, File Explorer, Search, Run, and Power Options. It’s all right here.

 
7. Use libraries (or not).


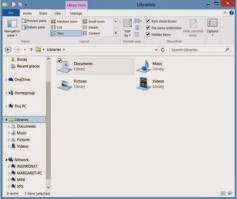
Windows has four default libraries: Documents, Music, Pictures, and Videos. You can also create your own libraries. The Documents library, for example, monitors two folders: the Documents folder (or My Documents folder) for the current Windows user and also the Documents folder (or My Documents) in the Public User folder.

When you open File Explorer in Windows 8.1, there’s no shortcut for Libraries in the navigation bar, and File Explorer opens to the This PC location. Each of those folders in the Folders section of the listing represent system folders for the currently signed-in user.

If you want to go back to Windows 8.0 and an earlier way of handling libraries, it’s an easy fix. In the navigation pane in File Explorer, right-click and choose Show Libraries. When you do that, the default location shown when File Explorer opens is the Libraries list, showing the four default library locations. The Libraries shortcuts also appear in the navigation pane.

 
8. Save location favourites in File Explorer.
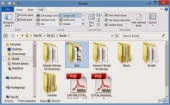

If there are certain locations you use a lot, you can choose to place shortcuts for them in the Favorites list in File Explorer. The Favorites list appears at the top of the navigation pane. To place a shortcut to a folder there, just drag-and-drop that folder from the main pane into the Favorites list.

 
9. Uninstall unwanted applications.


Removing unwanted software can free up hard disk space. Removing software can also make a PC run more cleanly and efficiently if the application being removed loaded a part of itself into memory when the computer started up.

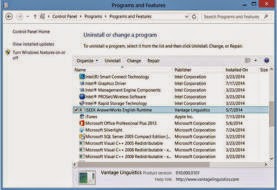
To see what software is installed, and potentially remove some of it, open the Control Panel. Under Programs, click Uninstall a program. Click an unwanted program. Click Uninstall.

To uninstall a Windows 8 app, right-click its shortcut, either on the Start screen or on the Apps list, and choose Uninstall. No prompts or options — it just removes itself quietly.

 
10. Prevent programs from loading at Startup.


To see what programs currently load at startup, right-click the taskbar and choose Task Manager. If you don’t see multiple tabs across the top of the window, click More details.

Click the Startup tab, and a list of startup programs appears. The Status column shows whether or not the program is currently set to load at startup, and the Startup Impact column shows how much of an impact on startup time and memory usage this program causes. To disable a program, click it and then click the Disable button.


--------------------------------
 

Sunday, 12 April 2015

79. Finding a misplaced file in Windows 8

Windows 8.1 creates folders to help you organize your files by type. You, the user, should also create folders in which to store your files, separated into type, usage, application etc. Within this mass of folders, it's easy to lose a file. Follow these steps to find a file:


1, To search for a misplaced file, begin on the Start screen.


Click on the Search icon (little magnifying glass). Type the name of a document or photo you have on your computer. The search results panel appears.

To search using a touchscreen, swipe from the right edge to display the charms bar. Select the Search charm. Select in the search box to display the virtual keyboard.


2 If you don’t see the document or photo you want, narrow the list of items by opening the Everywhere drop-down menu and choosing Files.

Initially, the search panel shows settings, files, web images, and web videos in the search results.


3 To open a file found in Step 1 or 2, select that file. Hit Enter
 

Then, close the app that opens that file by using one of these methods:

Mouse: Move the mouse pointer to the top of the screen. When the pointer changes to a hand symbol, click and hold down the left mouse button. Drag the app down until part of the app is off the bottom of the screen. Then release the left mouse button to close the app and return to the Start screen.

Touchscreen: Swipe down from the top of the screen until part of the app is off the bottom of the screen. Then lift your finger to close the app and return to the Start screen.

Keyboard: Press Alt+F4.

Strictly speaking, if you find what you’re looking for, stop looking. (No extra charge for pearls of wisdom.) In this case, however, keep looking because doing so reveals important information about how files are organized and how you can take control of that organization.


ALTERNATIVE METHOD


4 On the Start screen, select the Desktop tile. On the desktop, select the File Explorer icon in the taskbar.


File Explorer opens. Note the ribbon, which is the toolbar at the top of the window.

On the ribbon, tools are grouped by tabs, which in File Explorer consist of File, Home, Share, and View, as well as other tabs that appear based on the selection. Tabs are further divided into sections, labeled below the related tools. (Note, for example, the Clipboard section on the Home tab.)


5 Click your mouse into the Search box, below the ribbon and to the right. Type the name or part-name of the item you are looking for.

As you type, File Explorer displays any matching files, highlighting the text that matches. The figure shows the results of a search on my computer using the search term sierra.

On a touchscreen, the virtual keyboard doesn’t appear on the desktop until you select the keyboard icon on the right side of the taskbar.

If the search results include too many files, making it hard to see the one you want, type more of the file name in the Search box. The number of matching files should decrease as you type more text in the box.


6 To change the focus of your search to another more specific folder, select the relevant folder in the Navigation pane.


The focus of a search — where File Explorer searches — determines what files and folders are found. Because File Explorer opens with the focus on your whole PC, your initial search looks for files and folders throughout your computer.

If you have an idea where the file might be, such as in the Pictures, or Music folder, then navigate to that folder and start your search from the same box in that folder. This will narrow down the results.

You can use Search Tools in the ribbon to refine a search, as needed. Start a search, and then select the Search tab. In the section labeled Refine, select Date Modified and then select a time period ranging from Today to Last Year. Select Kind to limit the search to specific types of files. You can even select by size and other properties.


---------------------------


Monday, 16 March 2015

78. Parts of a Computer - 3. The Hard Drive

A typical HDD from a desktop PC


What is a Hard Disk Drive?
The hard disk drive is the main, and usually largest, data storage hardware device in a computer.

The operating system, software titles and most other files are stored in the hard disk drive.

The Hard Disk Drive is Also Known As
HDD (abbreviation), hard drive, hard disk, fixed drive, fixed disk, fixed disk drive

Important Hard Disk Drive Facts
The hard drive is sometimes referred to as the "C drive" due to the fact that Microsoft Windows designates the "C" drive letter to the primary partition on the primary hard drive in a computer by default.

While this is not a technically correct term to use, it is still common. For example, some computers have multiple drive letters (e.g. C, D, E) representing areas across one or more hard drives.

Popular Hard Disk Drive Manufacturers
 
Seagate, Western Digital, Hitachi

Hard Disk Drive Description
 
HDD from a laptop
A hard drive in a desktop or tower PC is usually the size of a paperback book but much heavier. Nowadays inside laptop (or notebook PCs) there are choices to be made between Solid State Drives known as SSDs, or normal drives which are a lot smaller than their big brothers inside the desktops. Smaller means in dimension only as their capacity can be up to 3TB. SSDs are still expensive compared to those with moving parts but they are reputedly
quicker on start up and run more quietly as they have no fans or moving parts.

The sides of the hard drive have pre drilled, threaded holes for easy mounting in the 3.5 inch drive bay in the computer case. Mounting is also possible in a larger 5.25 inch drive bay with an adapter. The hard drive is mounted so the end with the connections faces inside the computer.

The back end of the hard drive contains a port for a cable that connects to the motherboard. The type of cable used will depend on the type of drive but is almost always included with a hard drive purchase. Also here is a connection for power from the power supply.

Most hard drives also have jumper settings on the back end that define how the motherboard is to recognize the drive when more than one is present. These settings vary from drive to drive so check with your hard drive manufacturer for details.

Hard drives contain platters inside which spin at over 5,000 rpm. They are delicate little beasts and are prone to damage if jolted or dropped. ALWAYS HAVE YOUR DRIVES BACKED UP. They are hermetically sealed to prevent the ingress of dust or smoke etc.

Comparison of common particles to the head-gap
A Head Crash occurs when the read-write head hovering over the platter touches the platter itself. If that happens the HDD is usually ruined and has to be replaced. This diagram shows the relative thicknesses of a smoke particle, a human hair, and a dust particle compared to the gap between the read-write head and the coated surface of the platter. Crashes are usually caused by moving the drive whilst it is in motion, or dropping it as can happen with external drives.

Inserting a laptop HDD into a caddy
If you change the HDD inside your PC but it is still useable, say you have upgraded to a larger HDD, then the removed disk may be used inside a caddy which will house the disk and allow its use as an external drive for extra storage or backups of essential parts of your data. Here you can see a small caddy (Usual cost between 6 and 10 euros) being used to house a laptop HDD for external use. Small-form HDDs will be powered via the USB port on your PC whereas the larger disks removed from desktop machines require power from an adaptor plugged into the mains. Cables and power supplies always come with the purchase of caddies which are very easy to use.


-----------------------------
 

Monday, 23 February 2015

77. Parts of a Computer - 2. RAM


What is RAM? Random Access Memory (RAM) is the "working memory" in a computer. RAM is volatile in that all information stored there is lost when a PC is switched off so be sure to back up your working files as you go or you may find hours of work can disappear after an electricity spike.

Additional RAM allows a computer to work with more information at the same time which can have a dramatic effect on total system performance.

The amount of RAM which can be used by your PC depends upon its configuration and Operating System. Earlier Operating Systems would only support a maximum of 2GB even though the motherboard was big enough to accept 4GB. Even Windows 8.1 will only accept 4GB in certain cases so don’t waste your money buying RAM modules if your system will not be able to use it.

RAM limits in Windows 8.1 Enterprise – 4GB on x86, 512GB on x64

RAM limits in Windows 8.1 Professional – 4GB on x86, 512GB on x64

RAM limits in Windows 8.1 – 4GB on x86, 128GB on x64

(x86 refers to 32 bit systems and x64 refers to 64 bit systems).


RAM is Also Known As:-
main memory, internal memory.


Important RAM Facts
RAM is typically referred to simply as "memory" even though other types of memory may exist inside a computer. Each motherboard supports only a certain range of memory types in certain combinations so always check with your motherboard manufacturer before making a purchase.

RAM should not be confused with storage. Most modern PCs or laptops are supplied with 4GB of RAM but will have, typically, 500GB of storage on the hard disc drive.


Popular RAM Manufacturers
Kingston, PNY, Crucial Technology, Corsair

RAM Description
A standard "module" or "stick" of desktop memory is a long, thin piece of hardware and resembles a short ruler. The bottom of the memory module has one or more notches to guide for proper installation and is lined with numerous, usually gold-plated connectors.

Memory is installed in memory module slots located on the motherboard. These slots are easily locatable by looking for the small hinges on either side that lock the memory in place. Certain sizes of modules may need to be installed in certain slots so always check with your motherboard manufacturer before purchase or installation.

Memory modules come with various storage capabilities. Modern memory modules can be purchased in 256MB, 512MB, 1GB, 2GB, 4GB, and 8GB sizes.

--------------------------------
 

Tuesday, 3 February 2015

76. Parts of a Computer - 1. Optical Drive


What is an Optical Disc Drive?

Optical drives retrieve and/or store data on optical discs like CDs, DVDs, and BDs (Blu-ray discs) which hold much more information than classic portable media options like the floppy disk which is now virtually redundant.

The Optical Disc Drive is Also Known As optical drive, ODD (abbreviation), CD drive, DVD drive, BD drive, disc drive

Important Optical Disc Drive Facts
Most optical drives can play and/or record onto a large number of different disc formats.
Popular optical drive formats include CD-ROM, CD-R, CD-RW, DVD, DVD-RAM, DVD-R, DVD+R, DVD-RW, DVD+RW, DVD-R DL, DVD+R DL, BD-R, BD-R DL & TL, BD-RE, BD-RE DL & TL, and BDXL.
Read your drive’s specifications to check compatibility.

Popular Optical Disc Drive Manufacturers
LG, Memorex, NEC

Optical Disc Drive Description
An optical drive is a piece of computer hardware about the size of a thick soft cover book. The front of the drive has a small Open/Close button that ejects and retracts the drive bay door. This is how media like CDs, DVDs, and BDs are inserted into and removed from the drive. The tray can be motorized (as on desktop PCs) or may just pop out partly (like on a Laptop.)

Internal drives are mounted inside the PC case, external drives come with their own case and are usually connected via USB ports. They are usually powered from the USB port.

The sides of the internal optical drive have pre-drilled, threaded holes for easy mounting in the 5.25 inch drive bay in the computer case. The optical drive is mounted so the end with the connections faces inside the computer and the end with the drive bay faces outside.

The back end of the internal optical drive contains a port for a cable that connects to the motherboard. The type of cable used will depend on the type of drive but is almost always included with an optical drive purchase. Also here is a connection for power from the power supply.


-------------------------------------

Tuesday, 27 January 2015

75. Format MS Word as you type.


Can you format text while you’re typing into Word, or do you have to highlight text and format it when you’ve finished doing all the typing?

The answer is that you can do whichever you prefer – or use a combination of both if you like. Some people like to concentrate on getting all their text typed without distracting themselves over its appearance. They then go through it to make it look a bit better. You can highlight some text with the mouse and choose a different font or size for it, change its colour, make it bold or italic, and so on, and then move on to a different piece of text and format that as required.

If you want to change some aspect of the whole document (choosing a different font or size for it, for instance), pressing Ctrl+A will highlight everything for you. You can quickly select a single word by double-clicking it, or (slightly trickier, this!) select a whole paragraph by triple-clicking it.

However, many of us prefer to ‘format as we go’. When we know we want the next word to be italic, we press Ctrl+I (or click the Italic button on the toolbar); when we want to stop typing italics, we press Ctrl+I again (or click the Italic button again) to switch it off. Likewise, if we want the next text we type to be in a different font, or at a different size, we choose the required font and size, then continue typing.

If you choose the ‘format as you type’ method, it pays to learn a few key combinations for formatting text in Word. That way, you don’t have to keep taking a hand off the keyboard to reach for the mouse and click buttons. Here are some of the most useful:

Bold: Ctrl+B

Italic: Ctrl+I

Underline: Ctrl+U

Increase text size: Ctrl+Shift+>

Decrease text size: Ctrl+Shift+<

Align paragraph to the right: Ctrl+R

Align a paragraph centrally: Ctrl+E

Align a paragraph to the left: Ctrl+L

Choose a font and/or text size: Ctrl+Shift+F


Reproduced from PC Tips for Seniors


--------------------------------


Tuesday, 30 December 2014

74. Understand the Download options on software


Know the Terms: Freeware, Trialware, & More
Have you ever downloaded a program that you thought was free and then, after using it for a while, saw a warning or some other message appear, prompting for payment to continue?

Assuming you weren't tricked into the download (see the next section for help avoiding that problem), you either downloaded the wrong version, especially if a number of different download options were available, or were mistaken about the cost of the program.

Almost all software developers use these three categories to classify their software:

Freeware: This means that the program is completely free to use as described.

Trialware: This means that the program is free to use for a certain period or time, or for a certain number of uses, and then will need to be paid for. This is also sometimes called shareware or just trial software.

Commercial: This means that the program is not free at all and must be paid for before you can use it. Even most commercial programs these days provide limited time trial versions before asking for payment, so I see this designation less often.

Be weary of a program that just says it's "free" as there are plenty of ways to spin that. I talk a lot more about this next.

Free Downloads ≠ Free Software Just because something is a Free Download does not mean that the software is free.

Unfortunately, some software makers intentionally confuse visitors with this trick on their download pages. They use "free download" in all the page titles, all over the software description pages, and then you usually end up clicking a big FREE DOWNLOAD button to start the download.

Of course the download process is free! The software, however, requires payment for use, sometimes right away but often after a short period of use.

Some software makers do this in the hopes of driving revenue from people who thought they were downloading and using free software and then see little choice but to pay up. It's unethical and a rampant problem among lower quality software programs.

So, before you download something that's labeled as "free" or as a "free download," check to see that the program description clearly states that it's freeware or completely free to use.

Don't be Tricked by "Download" Advertisements 
Some of the most "successful" advertisements are those that trick a page's reader in to believing that the ad isn't really an ad, but something useful on that site.

These sorts of advertisements run frequently on software download pages, appearing as giant DOWNLOAD buttons. As much as these large buttons might appear to be what you need to click to download the software you're after, trust me, they're not.

Worse yet, these DOWNLOAD advertisements don't go to benign websites - they usually go to a malware-ridden page where you really do get to download something, just not the something you thought you were getting.

Real download buttons tend to be smaller and located closer to the downloadable file's name, version number, and last updated date. Not all software download pages have download buttons, either - many are just links.

Another "what to click" problem is a bit harder to solve, but worth the try:

Avoid "Installers" and "Download Managers"

Full-time software download sites, like Download.com and Softpedia, typically host software makers' programs for free.

One way these download sites make their money is by serving advertisements on their sites. Another, increasingly more common, way they make money is by wrapping the downloads they serve inside of a program called an installer, or less often inside a download manager.

These programs, often referred to as PUPs (potentially unwanted programs), have nothing to do with the program you're trying to download and install. The download site earns money from the makers of those programs by including them with the one you were after.

I do my best to avoid linking to sites that use installers and download managers but sometimes it's impossible, simply because the software I'm recommending isn't available elsewhere.

Assuming you can't find a non-installer download link for the software you want, you can always install the package anyway, being extremely careful what you agree to during the installation process:

Choose "Custom Installation" & Decline Additional Software 
Last, but certainly not least, please slow down and read the screens you're presented with as you install the software you just downloaded.

I'm not talking about the terms and conditions or the privacy policy. Don't get me wrong, you should read those too, but that's another discussion.

What's important here are the screens that are part of the installation wizard: the screens with the check boxes, "next" buttons, and all the stuff you agree or disagree to allow to be installed or tracked.

Unless you enjoy random browser toolbars, your home page being changed automatically, subscriptions to free software that you'll never use, and stuff like that, then I highly recommend that you carefully read every screen in the install wizard and decline anything that you're not interested in.

The biggest tip I have here is to choose the Custom Installation method, if you're given the option. This makes the install process a bit longer with the few extra screens it adds, but it's almost always where the "don't install this" options are hidden.

One way to avoid all of these installation-based problems is to choose portable software instead of installable software, when available. Many software makers create versions of their programs that run without needing to be installed at all.

Reproduced from a Tim Fisher article on About.com

--------------------------------
 

Monday, 20 October 2014

73. Word: Start a New Line without Starting a New Paragraph

When you’re typing into a Microsoft Word document and you press the Enter key, Word starts a new paragraph. In old versions (Word 2003 and 2002), it looks indistinguishable from a new line: the new paragraph appears immediately below the last one. In Word 2013, 2010 and 2007, however, some extra space is added between the two paragraphs. This can be altered of course by changing the format of your paragraphs but if you like the extra spaces, read on:

You might like the approach taken by these newer versions – it does make a document look a little neater – but it has a drawback. If you’re trying to type an address over several lines, you’d prefer it to look like a single block without gaps between each line. The same might apply if you’re typing list of items – you don’t really regard each item in the list as a separate paragraph, so you don’t want them all separated by white space.

What can you do about it? Well, the solution depends on whether or not you’ve already typed the text in question:

* If you’re just about to type the text – the address or the list – don’t press Enter at the end of each line. Instead, press Shift+Enter. That will give you a new line, but without starting a new paragraph, so you don’t get that enormous space between the lines.

* If you’ve already typed the text in question, begin by highlighting the entire address or list. Next, make sure the Home tab is selected on the Ribbon and move your mouse up to the ‘Styles’ section where you’ll see a wide white box containing items such as ‘Normal’, ‘No Spacing’ and ‘Heading 1’. In this box, click on No Spacing. This removes the extra space that was added between all those lines.

------------------------------------


Tuesday, 23 September 2014

72. How to "Zoom In" on a webpage


When you’re visiting a web page, it can sometimes be useful to zoom in and make everything on the page larger and easier to read. In Internet Explorer you should have a little ‘zoom’ button in the bottom-right corner of the window that makes this easy – each click on the button zooms the page to 125%, then 150%, then back to 100% (normal size) again. For more options, click the tiny arrow beside that button and choose a zoom setting ranging from 50% to 400%.

But what if you can’t see that zoom button? Here’s the solution:

1. Press the Alt key on your keyboard (to the left of the space bar) to make Internet Explorer’s menu bar appear.

2. Open the View menu and move the mouse down to Toolbars.

3. On the sub-menu that appears, click Status bar.

The status bar appears at the bottom of the window, with this zoom button at its right-hand end. (If you want to hide the status bar again, just repeat the same steps)

You don’t necessarily need this status bar in order to zoom in and out of the web page, there are other ways:

  • Hold down the Ctrl key on your keyboard and roll your mouse’s wheel away from you to make everything larger, or towards you to make it smaller.
  • Hold down the Ctrl key and repeatedly tap the + key on the top row of your keyboard to make everything bigger, or the – key to reduce it.
  • Click the cog icon in the top-right corner of the window, move the mouse to Zoom and click a zoom setting.

Happy viewing

---------------------------------------
 

Monday, 30 June 2014

71. Keyboard shortcuts we should all learn.


Using keyboard shortcuts can greatly increase your productivity, reduce repetitive strain, and help keep you focused. For example, highlighting text with the keyboard and pressing Ctrl + C is much faster than taking your hand from the keyboard, highlighting the text using the mouse, clicking copy from the file menu, and then putting your hand back in place on the keyboard. Below are our top 10 keyboard shortcuts we recommend everyone memorize and use.


Ctrl + C or Ctrl + Insert
 

Both Ctrl + C and Ctrl + Insert will copy the highlighted text or selected item.


Ctrl + V or Shift + Insert
 

Both the Ctrl + V and Shift + Insert will paste the text or object that's in the clipboard.


Ctrl + Z and Ctrl + Y
 

Undo any change. For example, if you cut text, pressing this will undo it. This can also often be pressed multiple times to undo multiple changes. Pressing Ctrl + Y would redo the undo.


Ctrl + F
 

Pressing Ctrl + F opens the Find in any program. This includes your Internet browser to find text on the current page.


Alt + Tab or Ctrl + Tab
 

Quickly switch between open programs moving forward.

Tip: Press Ctrl + Tab to switch between tabs in a program.

Tip: Adding the Shift key to Alt + Tab or Ctrl + Tab will move backwards. For example, if you are pressing Alt + Tab and pass the program you want to switch to, press Alt + Shift + Tab to move backwards to that program.

Tip: Windows Vista and 7 users can also press the Windows Key + Tab to switch through open programs in a full screenshot of the Window.


Ctrl + Back space and Ctrl + Left or Right arrow
 

Pressing Ctrl + Backspace will delete a full word at a time instead of a single character.

Holding down the Ctrl key while pressing the left or right arrow will move the cursor one word at a time instead of one character at a time. If you wanted to highlight one word at a time you can hold down Ctrl + Shift and then press the left or right arrow key to move one word at a time in that direction while highlighting each word.


Ctrl + S
 

While working on a document or other file in almost every program pressing Ctrl + S saves that file. This shortcut key should be used frequently anytime you're working on anything important.


Ctrl + Home or Ctrl + End
 

Ctrl + Home will move the cursor to the beginning of the document and Ctrl + End will move the cursor to the end of a document.


Ctrl + P
 

Open a print preview of the current page or document being viewed. For example, press Ctrl + P now to view a print preview of this page.


Page Up, Space bar, and Page Down
 

Pressing either the page up or page down key will move that page one page at a time in that direction. When browsing the Internet pressing the space bar also moves the page down one page at a time.

Tip: If you are using the space bar to go down one page at a time press the Shift key and space bar to go up one page at a time.


------------------------------------


Sunday, 8 June 2014

70. Try “Dropbox” for easy online storage and backup


If you (like me) tend to be lazy about backing up those really essential files or photographs then Dropbox is an easy and free way to keep your files safe. It also helps if you have two or more PCs and you want to access the same files from each one.

OK so total storage is not massive but I am talking “essential files” here.

For instance if you keep records for an organisation in Excel files, or say you do a website and want to make sure you don’t lose your work then this solution is easy and needs no intervention from you once it is set up. You can even share your files with other people.

Go along to Dropbox.com and set yourself up with an account. You will automatically get 2GB of storage and extra chunks may be had by referring friends etc. (Details on Dropbox.com)

When you then allow Dropbox to set itself up on your PC it creates a Dropbox folder. Any files you then add to this folder are synchronised with your “cloud” folder on the Dropbox website. Cool. You now have your working file and a backup file without any effort.

Now when I work on important files (such as these web pages), I work on the ones in my Dropbox folder knowing that when I exit and save the files they are automatically backed up for me to the cloud storage folder. Additionally, by using the same Dropbox account on my laptop, the files are then synchronised downwards on to the laptop PC. So if I want to take my PC to another location to work on any files in Dropbox I know that they are automatically synchronised to the cloud and to my main PC. If I am working in a location without Internet connection then the files will be synchronised as soon as my PC connects to the Internet back at home.

The Dropbox website will provide details of how you can share your files and also allow others to download files from your personal Dropbox Cloud folder. The folders are private and perfectly safe unless of course you divulge your access credentials.

In order to get some Dropbox space you first need to sign up for it. Creating a free account will get you 2GB of space to start. Go to Dropbox.com

This is not an advert for Dropbox and there are others available but this is a free, quick, and easy way to get started.
 

----------------------------------------------


Monday, 19 May 2014

69. Don’t be too quick to accept Friend requests


It’s exciting to see a Friend Request at the top of your Facebook page. You’re likely to accept Friend Requests without thinking twice, especially if it’s a friend or a name you recognize. You may even be thinking that there’s no real harm in accepting all Friend Requests that come your way. Having more friends means you’re more popular…right?

What you may not know is that with name, birth date, education, and work history available online, it’s relatively easy for anyone to create a duplicate of any existing user. Watch out, as cybercriminals could potentially be impersonating you or someone you know for the sole purpose of duping you and your friends!

Keep reading to learn what cybercriminals can do with phony accounts. We’ll share things to keep in mind as you decide whether or not to accept a Friend Request.


What Cybercriminals Do with Phony Accounts

Identity theft:
Facebook is a treasure chest of personal information. If you have a private account, when you accept a Friend Request, the information and pictures that were once restricted from public view become visible to your new “friend”. Because cybercriminals understand that a lot of people accept requests without thinking twice, the chances of someone accepting a request from a phony account is very high. Once cybercriminals have this bounty of information and pictures, it makes it all the easier for them to commit identity theft or other forms of crime.


Malicious Links:
Unless a user has set up their privacy setting, whenever they create a post on their own or a friend’s Timeline, it is made public on the News Feed. With a phony account, cybercriminals have the ability to spread malicious links to a substantial number of people. Once the malicious link is published onto a public News Feed, there is a high likelihood that someone will eventually click on the malicious link, where they will be directed to sites compromised by malware or phishing sites designed to trick users into revealing financial credentials.


Stalking:
In case identity theft and distributing malicious links weren’t bad enough, cybercriminals create phony accounts to stalk people. Phony accounts help cybercriminals stay under the radar, as the person they’re stalking are likely to accept the Friend Request without thinking twice.


Keep Your Eyes Open

Check your Friends List:
In the event you receive a Friend Request from someone you’re already friends with, take a few minutes to search for that person in your friends list. Also, sift through the profile to see if there are signs that the account isn’t legitimate. If the Friend Request is from someone you consider an acquaintance, it’s obviously more difficult to determine if the account is legitimate or not. But with a close friend, make sure to get in touch with them if you receive a second Friend request – if it’s a fake, the account needs to be reported to Facebook.


Reproduced from the Zone Alarm blog.

----------------------------------- 
 

Monday, 5 May 2014

68. Don't give your mobile batteries a "Memory"


When a notebook’s battery is in its first flush of youth, it should be good for between two and five hours’ use (depending on the notebook itself and how you’re using it). But the implication in the question above is that the questioner has always run the computer on mains power, and that makes a big difference.

Notebook batteries need exercise – they need to be made do some work. Otherwise they become lazy and dispirited, doing the battery equivalent of slumping in the sofa and watching TV all day. A battery that’s never called upon to do any work quickly forgets how to do it.

If your notebook is always run on mains power, that means its battery is kept fully-charged all the time and is never used. Over time, it gets ever more used to this lazy lifestyle until, when you do need it, it can’t muster the energy to do more than a few minutes’ work before giving up. Windows should give you a warning about low battery power a few minutes before the battery runs out, but if the battery is in such a sorry state that it can never manage more than a few minutes, you won’t get that warning: the PC simply switches off.

With a new notebook PC (or a new battery in your notebook), exercise the battery right at the beginning to maximise its lifespan. Charge it fully, then disconnect it from the mains and use it (or leave it sitting) until its battery runs down, then repeat the procedure, and repeat it again. In ideal circumstances, you’d use it on battery power whenever possible thereafter, but whether you do that or not, try to allow the battery to discharge itself fully every few weeks.

If you never use the notebook on battery power, and you sometimes run into the same problem as the questioner, a simple solution would be to remove its battery. This way, the notebook won’t switch on if you haven’t turned on the mains, so there’s no risk of it switching itself off after a few minutes. (It also makes your notebook a good deal lighter to carry around or to place on your lap!)

If you use your Notebook for long periods and wish to keep it on mains power then again, remove the battery until you have finished the extended use then replace the battery.

With replacement notebook batteries often costing upwards of £50, it’s well worth paying some attention to their well-being and eking out the maximum life from them.

That’s even more important for the batteries in tablet computers. Most tablets are not designed to have their batteries replaced – indeed, you’ll rarely see any sign of a battery compartment – so when a tablet’s battery bites the dust, the dust stays bitten!


With thanks to PC Tips for Seniors
 

-------------------------------

Monday, 14 April 2014

67. How secure is your own wifi network?


Reproduced from the Zone Alarm blog

It’s easier than ever to set up a wireless network. Plop in a WiFi router and connect to a DSL or cable modem, or if you are one of the lucky ones, with a FiOS box. But before you start online banking, shopping, and surfing the Web, make sure your network is secure from intruders.


You may think that your neighbor hopping onto your wireless network to check email is harmless. Actually, there is more at stake than the fact that this unauthorized person may hog up the bandwidth by streaming HD videos. This person, once on your network, can intercept all the data you are sending, trick you into going to a malicious site, and break into computers and other devices you may have connected over the WiFi. Letting someone you don’t know on to your network is essentially letting that person see all the data flowing in and out.

If you have your own WiFi network, it’s important you secure it from unauthorized users and devices by configuring the wireless router appropriately. While specific steps in the management software vary from vendor to vendor, and from router to router, the options are fairly universal and shouldn’t be too hard to find.

Below are some tips on how to enhance your wireless network security.


1. Encrypt with WPA2
When you set up your wireless network, you had the option to turn on encryption. For home networking users, you should turn on encryption (as opposed to running an open network) and you should select WPA2 as the encryption method. WEP is not secure and some of the other methods are generally out of reach for most home users. Even if you didn’t enable WPA2 when you first set up the network, your management software should let you turn it on after the fact.

When you select WPA2, you will be prompted to create a passkey for users to enter when trying to connect to the network. It is important—no, critical—to make sure the password is unique and complex so that outsiders can’t just brute-force or guess a password and hop on to the network. Make sure to select a string of characters that is fairly long and a mix of both numbers and letters. If your passkey is flimsy, then determined attackers will be able to breach your network anyway.

Don’t turn on WPS (WiFi Protected Setup). It doesn’t always work consistently, and its nine-digit PIN is vulnerable to guessing attempts. Once the attacker figures out the PIN for WPS, there is nothing stopping the adversary from accessing any shared data that resides on your wireless network.


2. Change Default Passwords
Many of the routers ship with a default password for the administrator management software. It could be “admin,” or even a blank password, and is quite often printed somewhere in the documentation and available online. Users should immediately change the password for the management interface while setting up the wireless network so that outsiders can’t reach the management interface. If adversaries get access to the management interface, they have full control over your router and you would be in serious trouble.

While you are changing passwords, check to see if the router shipped with any pre-created SSIDs. SSIDs are the names of the wireless networks configured for the router. You should change the passwords for these SSIDs even if you aren’t using them, just in case.


3. Clean up the list of SSID names
Speaking of SSIDs, vendors tend to use very generic names for the SSIDs, such as ‘linksys’ or ‘netgear-wireless.’ Change them from the default to something unique. Attackers can launch man-in-the-middle attacks by using frequently used SSIDs for their rogue wireless hotspots which could be used to trick devices into connecting to that network. Having a different SSID name and password ensures that it will be harder for a person to guess and break in.

It may be just easier to delete all the SSIDs on the router (usually listed under “wireless” on the management software) other than the one you are using. Why increase the potential attack surface? After you have cleaned up your list of SSIDs, hide the name. Some vendors call this cloaking, but the idea is to prevent the SSID from broadcasting to all devices in the vicinity. You can connect by manually entering the name of your network, but other people won’t know that network is there.


4. Regularly Check Who Is Connected
The management software generally has a section called “Device List”, which shows the computer name of all the devices that are connected to the wireless network. It’s a good idea to periodically go in and check to make sure you recognize the names. To prevent unknown devices from ever being able to connect, you can enable Mac Address Filtering. This will require you to know how to get your device’s hardware address (MAC Address) so that you can enter it in the software. It can be a little manual and time-consuming, but it ensures no one will ever be able to get on the network without your knowing about it.

Your router has other advanced features, such as “guest networking”, which you should turn off, and a firewall, which you should turn on. If you aren’t already running a software firewall, turning on the router’s firewall is critical, but it’s not a bad idea to have both to boost your layers of security.

Regularly update your router firmware when they are available, and you’ll have a pretty secure wireless network. It’s worth the time to set it up properly as a closed network will save you tons of headaches down the road.

-----------------------------------


Saturday, 5 April 2014

66. Watch out for that bogus call from "Microsoft"


Two articles related to the same problem:-

From PC Tips for Seniors www.pcforseniors.co.uk.

Microsoft Telephone Scammer Forced to Hang Up

 Its perpetrator has finally been caught and sentenced.

 Unlike most scams, which start with an email message, this one revolved around an unexpected telephone call. The caller would claim to be working for Microsoft and would try to convince you that your PC was infected by countless viruses. Somehow, without alerting you to these problems, your PC had contacted Microsoft, and Microsoft was kindly phoning you at its own expense to sort them out.

 If you hadn’t already hung up by this point, the caller would try to ‘prove’ his case by directing you to an area of Windows containing a long and worryingly-technical list of items. These, he’d claim, were all the viruses that had infected your PC. If you were convinced by this, you’d be encouraged to hand over remote control of your PC to the caller so that he could ‘fix it’ – but only after parting with payment for this service.

 Now, with a bit of luck, this scam has been shut down. You can read the full story on the BBC’s website at www.bbc.co.uk/news/technology-26818745, but the upshot is that the scammer has been caught, sentenced and fined. It’s not much of a sentence (or much of a fine, although the court costs help to inflate it), but it should ensure that he doesn’t do it again.

 Of course, there’s no knowing whether this scam was all the work of one man, or whether there are others still at large and still operating the same racket. In case there are, remember how it works and be sure to hang up if you receive a phone call making similarly outrageous claims.
--------------------
 
 
Telephone messages from “Windows.”

Earlier this year telephone calls were received purporting to be coming from Windows advising that the computer of the person called was putting out messages that were affecting a large number of other computers. It was requested that the person receiving these calls be talked through putting a programme on their computer to remedy the fault. Persons had agreed and an extortionate amount of money was demanded for this service. This was a scam and computers had to be taken to a computer shop to have the computers repaired.

The calls originated from Liverpool and Cairo in Egypt and could be made from all over the world and with today´s technology appear to have come from a telephone number anywhere else in the world. The British Police in the Liverpool area were aware of this but could only advise people to ignore this scam.
I have recently received again one of these calls. It was made by a man with an Asian accent who said that he was calling from Windows and was in America. My phone showed “Number Privado”.
BEWARE. THEY ARE STILL ABOUT
Do not give these any information ...just put the phone down
 
------------------------
Little computer tip in case you did not know The difference between http and https... the little thing that means a lot.

 
The main difference between http:// and  https://


It's all about security - HTTP stands for Hyper Text Transport Protocol.
 
The S (big surprise)stands for "Secure". If you visit a website or webpage, and look at the address in the web browser, it will likely begin with the following: http://. This means that the website is talking to your browser using the regular 'unsecure' language. In other words, it is possible for someone to "eavesdrop" on your computer's conversation with the website. If you fill out a form on the website, someone might see the information you send to that site.

This is why you never ever enter your credit card number in a http website!


But if the web address begins with https:// that basically means your computer is talking to the website in a secure code that no one can eavesdrop on. You understand why this is so important, right?

If a website ever asks you to enter your credit card information, you should automatically look to

see if the web address begins with https://

If it doesn't, there's no way you should ever enter sensitive information like a credit card number, PIN, Social Security #, etc.

Be very careful
 
 
-----------------------------------


Saturday, 29 March 2014

65. Typosquatting: How Spelling Errors Could Lead to Scams


It’s a common enough scenario, and familiar to most: When typing a URL in the Web browser’s address bar, you accidentally mistype the name. You may type ctibank.com instead of citibank.com, gacebook.com instead of facebook.com, or the ever popular gooogle.com instead of google.com.
 
The page at the wrong address is an example of typosquatting, where scammers register domains with names that are similar to legitimate sites. The owner of the site benefits from the fact that the user mistyped the name, whether by displaying ads and links, setting up fake storefronts, or tricking users with phishing pages.


At best, it’s just an annoyance. At its worst, it may be malicious. And it’s pretty prevalent. Experts have estimated nearly 80 percent of mistyped URLs wind up on typosquatting sites.


Not Always Bad, But Usually
Of course, some sites may legitimately have addresses that look similar to popular brands. Those are easy to figure out. If you land on goole.com, you will know it’s a site about an English town, and not a typosquatting one. Then there are the pages that seem harmless, such as the ones displaying advertisements or a parked page with a bunch of links. The typosquatting page window.com has links to Windows 7 and Windows 8, but if you don’t click on it and just close the window, no harm done.

While advertisements, offers to sell you the domain, or these parked pages constitute a majority of the typosquatting sites, there is a very real danger associated with these fake pages. Cybercriminals can grab these domains to create fake websites that look similar to the actual site so that users don’t realize right away they’ve landed in the wrong place. This is the perfect setup for a phishing scam, to trick users into entering their login credentials before redirecting them back to the real site. The users don’t realize what happened, and the criminals operating the site now have their information.

Fake sites Wikapedia.com and Twtter.com took the phishing scam another step further, by making the pages look like the real sites and displaying advertisements for contests offering iPads and MacBooks as prizes. Users were prompted to enter their credit card information and other sensitive information as part of the contest to claim their prizes.


Fraudulent Transactions
Scammers may set up an online store to convince visitors to browse and shop for products. If it was a typo domain appl.com, users may not realize they’d just bought junk and not a brand new Mac Book Pro. Or they may see a link for iTunes but wind up signing up for a service that sends prime-rate SMS messages to your cellphone.

Scammers may also be using the sites to drive some clicks to their advertising campaigns. Don’t click.

Criminals may setup sites hosting malware at these sites. This is a bit more unusual, since attackers aren’t going to be able to dispose of the domain and move onto a new one when the address invariably gets blacklisted for hosting malware. There aren’t that many variations of the domain name the attackers can use, so they tend to use other scams instead that will let them use the domain for a longer period of time.


How to Stay Safe
Companies take typosquatting seriously. Apple has in the past gone to the courts regarding appl.com, wwwApple.com, appl-e.com, and apples-stores.com for being too similar to its own domain name. Back in 2012, a United Kingdom watchdog organization fined wikapedia.com and Twtter.com $156,000 each for trying to trick users into thinking they were the real sites. A California judge ruled in favour of Facebook in May last year, awarding the social networking giant close to $2.8 million in damages and control of a little over a hundred domains with misspelled variants of its name.

When typing in the link to a website, pay close attention to what you type. Don’t just hit enter or click on “search” right away—read over what you typed to try to catch that typo at the last minute.

It’s also important to get in the habit of quickly checking the URL to make sure you landed on the page you intended. Sometimes the site may look like the real thing, and that last check can help you from making a big mistake.

Enable safe browsing mode in the Web browser. Internet Explorer, Firefox, and Chrome all have features where they block access to a page suspecting of hosting malware or otherwise malicious. If the site you fat-fingered is malicious, the browser will stop you.

Make sure your security software is up-to-date. If the typosquatting page hosts malware, the antivirus software will most likely detect the danger and block the file from being downloaded onto your computer.

Above all, never, ever, click on links in emails, text, chat messages, or social networking sites. You may not realize the links have a typo when you first look at it. If you type the URL instead of clicking, you will notice the typo, and thus avoid the scam.


(c) Zone Alarm Newsletter
 
---------------------------------