Installing new applications in Windows can be carried out in various ways depending upon your operating system (o/s), i.e. Windows XP, Vista, or 7.
The first thing you need to discover is the name of the file which will do the job of installing the software. In most cases you will have an executable file on the install media named either install.exe or setup.exe. In some cases you may have a file named after the application as we saw when installing Abbyy Fine Reader, or some CDs will have an autorun.exe file. If an Autorun file exists then always use this as sometimes the installer needs an extra parameter and this will be included in the Autorun.inf file which always accompanies an Autorun.exe. Usually, if an Autorun file exists on a CD it will do just that and automatically start the installation program for you.
I do not want to overcomplicate matters so let us concentrate on simply running one of the files which we have identified as the installation file.
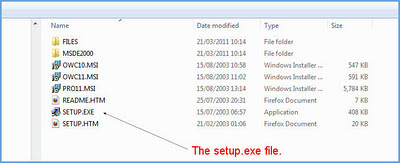
Using Windows Explorer or My Computer, locate the folder or disc containing the software which you wish to install and find the installation file. In the folder shown here I have pointed out the file I will use. Please note however that there are two files named SETUP, one having the .htm extension. As I have encouraged you to do, I am displaying my file extensions (the characters after the dot) and so can easily distinguish between the .exe and .htm files.

This setup.exe will install Microsoft Office 2003. I have deliberately chosen a complicated install as, after this, all others are easy. The principle is the same but you don't usually have as many choices to make and questions to answer.
1. Double click on setup.exe. This will begin the installation process and start to copy files onto the PC.
2. Enter the Licence Code in the boxes provided. This is usually supplied on the box or sleeve of the CD and must be used each time the software is installed. Here I must state that legally you are only licenced to install and run MS Office on one PC but obviously you may re-install it if you buy a new PC or if anything happens to the original. If you dispose of the PC you are obliged to remove the copy of MS Office.

3. Enter your personal details if you wish, then accept the End User Licence Agreement (EULA)
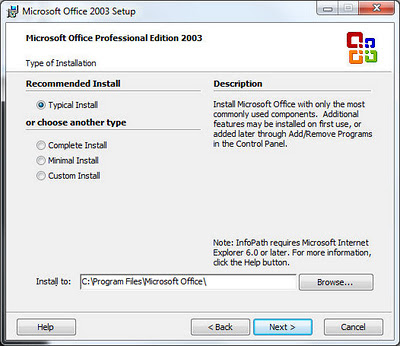
4. You now have choices to make. What type of installation and where. A typical install is usually fine for most people but if there are elements you don't want then click on the Custom Install radio button. From here you can add or remove whole applications or add elements to the basic install of the others. When you have completed your choices click "Next".

5. Another screen will appear to confirm your choices, click on "Install" and sit back and relax.
Piece of cake!
Most installs follow a pattern similar to this but some don't ask for licence codes, some don't ask for installation choices. In most cases you can simply accept the "default" actions and you will have a perfectly useable program installed. If there are elements which you need to install later then run your install application again. This will usually recognize that you already have that program on disc and will ask if you wish to amend it. You can then change or add any choices and away you go!
Sometimes you will be asked to restart your machine after installation to allow the installer to finalize Registry changes or to amend files which were in use at the time.
~~~~~~~~~~~~~~~~~~~~~~~~~~~
An alternative method for XP users is to follow these steps.
1 Choose Start→Control Panel.
The Start button is located at the bottom-left corner of your screen, and Control Panel will show up on the Start menu once you click the Start button.
2 Click the Add or Remove Programs icon.
If you hover your cursor over the icon, a pop-up will read: "Install or remove programs and Windows components." This confirms that you've found the right icon.
3 Click the Add New Programs button and then click the CD or Floppy button.
The button is located on the left.
4 Click Next to run the software.
The resulting Install Program from CD or Floppy dialog box appears.
5 Follow the prompts for that software installation.
Don't worry about doing any customizing while installing software. Standard installation is normally recommended and sufficient.
Some programs require you to restart your computer when installing new software. This completes the setup of the new program.
-------------------------