Wednesday 29 April 2015

80. Ten tips for working in Windows 8.1

No matter how you use Windows 8.1 — on a desktop with mouse and keyboard or via the touchscreen — there are some ways to make it easier and more efficient to use. Following are ten tips for getting the most out of Windows 8.1.


1. Use Search to start applications.

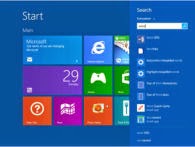
There’s no need to browse the Apps list to find a particular program, and no need to remember what category it’s in. To start an application, display the Start screen (pressing the Windows key is one way) and then type the first few letters of the application’s name. In the search results that appear, click the application.

 
2. Reorganize the Start screen.


The Start screen contains tiles for many applications, mainly the ones that come free with Windows. These shortcuts are merely suggestions, though; you aren’t bound to any of them. Removing a tile from the Start screen doesn’t uninstall the application, and you can still access that application from the Apps list any time you want it.

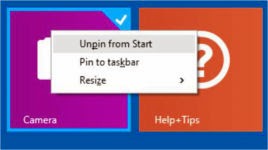
In short, don’t be afraid to remove tiles from the Start screen and replace them with tiles for the applications that you actually use on a regular basis. You can always re-pin any applications there that you end up using more than you thought.

To remove a tile, right-click the tile and choose Unpin from Start. Notice that you’re not deleting the application. You are just releasing it from being represented on the Start screen.

 
3. Pin shortcuts to the taskbar.


You might appreciate that Windows lets you pin shortcuts to the desktop’s taskbar. You could pin all your favorite apps there, and avoid the Start screen altogether 90 percent of the time. Pinned shortcuts on the taskbar appear on the left side, just to the right of the Start button. By default, the taskbar has two pinned shortcuts: Internet Explorer and File Explorer.

There’s a Pin to Taskbar command on the right-click menu for an app. You can use that to pin any application to the Start screen. You can even pin Windows 8-style applications that don’t run on the desktop; when you run one of those, Windows switches to full-screen view for that application.

 
4. Make icons and text larger. 

An LCD screen looks best at its highest resolution (its native resolution), but with today’s high-res screens, the highest resolution is pretty darned high. That means that the text and icons on the screen may be very tiny. Unless you have great vision, and just happen to like everything being small, that can be a problem.

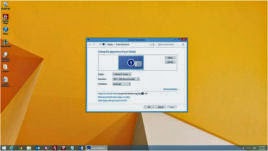
For example, this screen is in 1920 x 1080 resolution and uses the default size for text and icons (Smaller). So tiny!

To change the icon and text size without changing the resolution, right-click the desktop and choose Screen Resolution. Click the Make Text and Other Items Larger or Smaller hyperlink near the bottom of the window. In the Change the Size of All Items area, choose the desired size: Smaller, Medium, or Larger.

 
5. Switch between programs quickly.


When you are running multiple applications, there are lots of different ways to switch among them:

Hold down the Alt key and press and release the Tab key. Each time you do so, a different application becomes active on the bar that appears in the center of the screen. When the item you want is highlighted, release the Alt key to make that window or application active.

If you’re viewing the desktop, click the application’s icon on the taskbar.

To switch among Windows 8 style apps, point the mouse pointer to the top left corner of the screen. A thumbnail of the last-used Windows 8 app appears. Click it to switch to it, or move the mouse downward to see a bar containing thumbnails of all open Windows 8 apps, and then click the one you want. If nothing happens when you point at the upper-right corner of the screen, no Windows 8 apps are open.

 
6. Right-click the Start button.


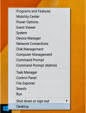
From the desktop, right-click the Start button, and a shortcut menu appears. On this shortcut menu are links to almost every utility program you might ever want to access in Windows, including Control Panel, Device Manager, Computer Management, File Explorer, Search, Run, and Power Options. It’s all right here.

 
7. Use libraries (or not).


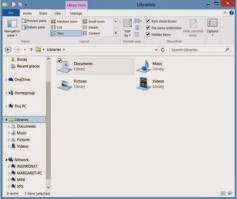
Windows has four default libraries: Documents, Music, Pictures, and Videos. You can also create your own libraries. The Documents library, for example, monitors two folders: the Documents folder (or My Documents folder) for the current Windows user and also the Documents folder (or My Documents) in the Public User folder.

When you open File Explorer in Windows 8.1, there’s no shortcut for Libraries in the navigation bar, and File Explorer opens to the This PC location. Each of those folders in the Folders section of the listing represent system folders for the currently signed-in user.

If you want to go back to Windows 8.0 and an earlier way of handling libraries, it’s an easy fix. In the navigation pane in File Explorer, right-click and choose Show Libraries. When you do that, the default location shown when File Explorer opens is the Libraries list, showing the four default library locations. The Libraries shortcuts also appear in the navigation pane.

 
8. Save location favourites in File Explorer.


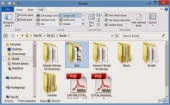
If there are certain locations you use a lot, you can choose to place shortcuts for them in the Favorites list in File Explorer. The Favorites list appears at the top of the navigation pane. To place a shortcut to a folder there, just drag-and-drop that folder from the main pane into the Favorites list.

 
9. Uninstall unwanted applications.


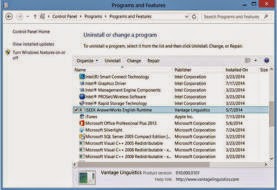
Removing unwanted software can free up hard disk space. Removing software can also make a PC run more cleanly and efficiently if the application being removed loaded a part of itself into memory when the computer started up.

To see what software is installed, and potentially remove some of it, open the Control Panel. Under Programs, click Uninstall a program. Click an unwanted program. Click Uninstall.

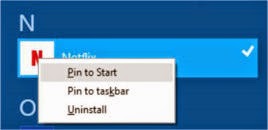
To uninstall a Windows 8 app, right-click its shortcut, either on the Start screen or on the Apps list, and choose Uninstall. No prompts or options — it just removes itself quietly.

 
10. Prevent programs from loading at Startup.


To see what programs currently load at startup, right-click the taskbar and choose Task Manager. If you don’t see multiple tabs across the top of the window, click More details.

Click the Startup tab, and a list of startup programs appears. The Status column shows whether or not the program is currently set to load at startup, and the Startup Impact column shows how much of an impact on startup time and memory usage this program causes. To disable a program, click it and then click the Disable button.


--------------------------------
 

Sunday 12 April 2015

79. Finding a misplaced file in Windows 8

Windows 8.1 creates folders to help you organize your files by type. You, the user, should also create folders in which to store your files, separated into type, usage, application etc. Within this mass of folders, it's easy to lose a file. Follow these steps to find a file:


1, To search for a misplaced file, begin on the Start screen.


Click on the Search icon (little magnifying glass). Type the name of a document or photo you have on your computer. The search results panel appears.

To search using a touchscreen, swipe from the right edge to display the charms bar. Select the Search charm. Select in the search box to display the virtual keyboard.


2 If you don’t see the document or photo you want, narrow the list of items by opening the Everywhere drop-down menu and choosing Files.

Initially, the search panel shows settings, files, web images, and web videos in the search results.


3 To open a file found in Step 1 or 2, select that file. Hit Enter
 

Then, close the app that opens that file by using one of these methods:

Mouse: Move the mouse pointer to the top of the screen. When the pointer changes to a hand symbol, click and hold down the left mouse button. Drag the app down until part of the app is off the bottom of the screen. Then release the left mouse button to close the app and return to the Start screen.

Touchscreen: Swipe down from the top of the screen until part of the app is off the bottom of the screen. Then lift your finger to close the app and return to the Start screen.

Keyboard: Press Alt+F4.

Strictly speaking, if you find what you’re looking for, stop looking. (No extra charge for pearls of wisdom.) In this case, however, keep looking because doing so reveals important information about how files are organized and how you can take control of that organization.


ALTERNATIVE METHOD


4 On the Start screen, select the Desktop tile. On the desktop, select the File Explorer icon in the taskbar.


File Explorer opens. Note the ribbon, which is the toolbar at the top of the window.

On the ribbon, tools are grouped by tabs, which in File Explorer consist of File, Home, Share, and View, as well as other tabs that appear based on the selection. Tabs are further divided into sections, labeled below the related tools. (Note, for example, the Clipboard section on the Home tab.)


5 Click your mouse into the Search box, below the ribbon and to the right. Type the name or part-name of the item you are looking for.

As you type, File Explorer displays any matching files, highlighting the text that matches. The figure shows the results of a search on my computer using the search term sierra.

On a touchscreen, the virtual keyboard doesn’t appear on the desktop until you select the keyboard icon on the right side of the taskbar.

If the search results include too many files, making it hard to see the one you want, type more of the file name in the Search box. The number of matching files should decrease as you type more text in the box.


6 To change the focus of your search to another more specific folder, select the relevant folder in the Navigation pane.


The focus of a search — where File Explorer searches — determines what files and folders are found. Because File Explorer opens with the focus on your whole PC, your initial search looks for files and folders throughout your computer.

If you have an idea where the file might be, such as in the Pictures, or Music folder, then navigate to that folder and start your search from the same box in that folder. This will narrow down the results.

You can use Search Tools in the ribbon to refine a search, as needed. Start a search, and then select the Search tab. In the section labeled Refine, select Date Modified and then select a time period ranging from Today to Last Year. Select Kind to limit the search to specific types of files. You can even select by size and other properties.


---------------------------


Monday 16 March 2015

78. Parts of a Computer - 3. The Hard Drive

A typical HDD from a desktop PC


What is a Hard Disk Drive?
The hard disk drive is the main, and usually largest, data storage hardware device in a computer.

The operating system, software titles and most other files are stored in the hard disk drive.

The Hard Disk Drive is Also Known As
HDD (abbreviation), hard drive, hard disk, fixed drive, fixed disk, fixed disk drive

Important Hard Disk Drive Facts
The hard drive is sometimes referred to as the "C drive" due to the fact that Microsoft Windows designates the "C" drive letter to the primary partition on the primary hard drive in a computer by default.

While this is not a technically correct term to use, it is still common. For example, some computers have multiple drive letters (e.g. C, D, E) representing areas across one or more hard drives.

Popular Hard Disk Drive Manufacturers
 
Seagate, Western Digital, Hitachi

Hard Disk Drive Description
 
HDD from a laptop
A hard drive in a desktop or tower PC is usually the size of a paperback book but much heavier. Nowadays inside laptop (or notebook PCs) there are choices to be made between Solid State Drives known as SSDs, or normal drives which are a lot smaller than their big brothers inside the desktops. Smaller means in dimension only as their capacity can be up to 3TB. SSDs are still expensive compared to those with moving parts but they are reputedly
quicker on start up and run more quietly as they have no fans or moving parts.

The sides of the hard drive have pre drilled, threaded holes for easy mounting in the 3.5 inch drive bay in the computer case. Mounting is also possible in a larger 5.25 inch drive bay with an adapter. The hard drive is mounted so the end with the connections faces inside the computer.

The back end of the hard drive contains a port for a cable that connects to the motherboard. The type of cable used will depend on the type of drive but is almost always included with a hard drive purchase. Also here is a connection for power from the power supply.

Most hard drives also have jumper settings on the back end that define how the motherboard is to recognize the drive when more than one is present. These settings vary from drive to drive so check with your hard drive manufacturer for details.

Hard drives contain platters inside which spin at over 5,000 rpm. They are delicate little beasts and are prone to damage if jolted or dropped. ALWAYS HAVE YOUR DRIVES BACKED UP. They are hermetically sealed to prevent the ingress of dust or smoke etc.

Comparison of common particles to the head-gap
A Head Crash occurs when the read-write head hovering over the platter touches the platter itself. If that happens the HDD is usually ruined and has to be replaced. This diagram shows the relative thicknesses of a smoke particle, a human hair, and a dust particle compared to the gap between the read-write head and the coated surface of the platter. Crashes are usually caused by moving the drive whilst it is in motion, or dropping it as can happen with external drives.

Inserting a laptop HDD into a caddy
If you change the HDD inside your PC but it is still useable, say you have upgraded to a larger HDD, then the removed disk may be used inside a caddy which will house the disk and allow its use as an external drive for extra storage or backups of essential parts of your data. Here you can see a small caddy (Usual cost between 6 and 10 euros) being used to house a laptop HDD for external use. Small-form HDDs will be powered via the USB port on your PC whereas the larger disks removed from desktop machines require power from an adaptor plugged into the mains. Cables and power supplies always come with the purchase of caddies which are very easy to use.


-----------------------------
 

Monday 23 February 2015

77. Parts of a Computer - 2. RAM


What is RAM? Random Access Memory (RAM) is the "working memory" in a computer. RAM is volatile in that all information stored there is lost when a PC is switched off so be sure to back up your working files as you go or you may find hours of work can disappear after an electricity spike.

Additional RAM allows a computer to work with more information at the same time which can have a dramatic effect on total system performance.

The amount of RAM which can be used by your PC depends upon its configuration and Operating System. Earlier Operating Systems would only support a maximum of 2GB even though the motherboard was big enough to accept 4GB. Even Windows 8.1 will only accept 4GB in certain cases so don’t waste your money buying RAM modules if your system will not be able to use it.

RAM limits in Windows 8.1 Enterprise – 4GB on x86, 512GB on x64

RAM limits in Windows 8.1 Professional – 4GB on x86, 512GB on x64

RAM limits in Windows 8.1 – 4GB on x86, 128GB on x64

(x86 refers to 32 bit systems and x64 refers to 64 bit systems).


RAM is Also Known As:-
main memory, internal memory.


Important RAM Facts
RAM is typically referred to simply as "memory" even though other types of memory may exist inside a computer. Each motherboard supports only a certain range of memory types in certain combinations so always check with your motherboard manufacturer before making a purchase.

RAM should not be confused with storage. Most modern PCs or laptops are supplied with 4GB of RAM but will have, typically, 500GB of storage on the hard disc drive.


Popular RAM Manufacturers
Kingston, PNY, Crucial Technology, Corsair

RAM Description
A standard "module" or "stick" of desktop memory is a long, thin piece of hardware and resembles a short ruler. The bottom of the memory module has one or more notches to guide for proper installation and is lined with numerous, usually gold-plated connectors.

Memory is installed in memory module slots located on the motherboard. These slots are easily locatable by looking for the small hinges on either side that lock the memory in place. Certain sizes of modules may need to be installed in certain slots so always check with your motherboard manufacturer before purchase or installation.

Memory modules come with various storage capabilities. Modern memory modules can be purchased in 256MB, 512MB, 1GB, 2GB, 4GB, and 8GB sizes.

--------------------------------
 

Tuesday 3 February 2015

76. Parts of a Computer - 1. Optical Drive


What is an Optical Disc Drive?

Optical drives retrieve and/or store data on optical discs like CDs, DVDs, and BDs (Blu-ray discs) which hold much more information than classic portable media options like the floppy disk which is now virtually redundant.

The Optical Disc Drive is Also Known As optical drive, ODD (abbreviation), CD drive, DVD drive, BD drive, disc drive

Important Optical Disc Drive Facts
Most optical drives can play and/or record onto a large number of different disc formats.
Popular optical drive formats include CD-ROM, CD-R, CD-RW, DVD, DVD-RAM, DVD-R, DVD+R, DVD-RW, DVD+RW, DVD-R DL, DVD+R DL, BD-R, BD-R DL & TL, BD-RE, BD-RE DL & TL, and BDXL.
Read your drive’s specifications to check compatibility.

Popular Optical Disc Drive Manufacturers
LG, Memorex, NEC

Optical Disc Drive Description
An optical drive is a piece of computer hardware about the size of a thick soft cover book. The front of the drive has a small Open/Close button that ejects and retracts the drive bay door. This is how media like CDs, DVDs, and BDs are inserted into and removed from the drive. The tray can be motorized (as on desktop PCs) or may just pop out partly (like on a Laptop.)

Internal drives are mounted inside the PC case, external drives come with their own case and are usually connected via USB ports. They are usually powered from the USB port.

The sides of the internal optical drive have pre-drilled, threaded holes for easy mounting in the 5.25 inch drive bay in the computer case. The optical drive is mounted so the end with the connections faces inside the computer and the end with the drive bay faces outside.

The back end of the internal optical drive contains a port for a cable that connects to the motherboard. The type of cable used will depend on the type of drive but is almost always included with an optical drive purchase. Also here is a connection for power from the power supply.


-------------------------------------

Tuesday 27 January 2015

75. Format MS Word as you type.


Can you format text while you’re typing into Word, or do you have to highlight text and format it when you’ve finished doing all the typing?

The answer is that you can do whichever you prefer – or use a combination of both if you like. Some people like to concentrate on getting all their text typed without distracting themselves over its appearance. They then go through it to make it look a bit better. You can highlight some text with the mouse and choose a different font or size for it, change its colour, make it bold or italic, and so on, and then move on to a different piece of text and format that as required.

If you want to change some aspect of the whole document (choosing a different font or size for it, for instance), pressing Ctrl+A will highlight everything for you. You can quickly select a single word by double-clicking it, or (slightly trickier, this!) select a whole paragraph by triple-clicking it.

However, many of us prefer to ‘format as we go’. When we know we want the next word to be italic, we press Ctrl+I (or click the Italic button on the toolbar); when we want to stop typing italics, we press Ctrl+I again (or click the Italic button again) to switch it off. Likewise, if we want the next text we type to be in a different font, or at a different size, we choose the required font and size, then continue typing.

If you choose the ‘format as you type’ method, it pays to learn a few key combinations for formatting text in Word. That way, you don’t have to keep taking a hand off the keyboard to reach for the mouse and click buttons. Here are some of the most useful:

Bold: Ctrl+B

Italic: Ctrl+I

Underline: Ctrl+U

Increase text size: Ctrl+Shift+>

Decrease text size: Ctrl+Shift+<

Align paragraph to the right: Ctrl+R

Align a paragraph centrally: Ctrl+E

Align a paragraph to the left: Ctrl+L

Choose a font and/or text size: Ctrl+Shift+F


Reproduced from PC Tips for Seniors


--------------------------------