Friday, 23 September 2011

7. Data Storage and Disc Partitioning

Data storage in PCs comes mainly in two forms. The memory in a PC is known as RAM (Random Access Memory) and is used for temporary storage of program instructions and the data necessary to carry out those instructions (word processing or spreadsheet data for example). This is volatile storage and it is emptied when the PC is turned off completely. The other main type of storage is that found on HDDs (Hard Disc Drives) and this storage to all intents and purposes is permanent until erased. You can add to this storage by using everything from a simple USB stick to an external HDD and on to Network Attached Storage devices containing hundreds of Terabytes of storage.

Other devices exist such as CDs, DVDs, PROMs, EPROMs etc. but this article concerns the HDDs in or attached to our PCs.

Your starting point is the HDD in your PC and this will contain your Operating System (OS), Applications, and some of your data. Other articles will follow regarding data-safety but for now I am explaining about data storage on your HDDs. The HDD in your PC is the most important one to start with and you should take all steps possible to protect it and its data either from malicious attack from viruses etc. and from human error.

An HDD consists of several round platters which spin at several thousand rpm. The platter is coated in a magnetic media (something like the surface of a cassette tape) and hovering some microns above it is the read/write head which as the name suggests reads from the platter or writes data to it. HDDs in notebooks are quite robust but you should never shake or bump an HDD whilst it is in use. The distance between the read/write head and the platter is smaller than the diameter of a smoke particle and any severe movement can cause the head to touch the platter and damage it beyond repair. This has always been known as a "Head Crash" and you may have heard the term.

Each platter is divided into concentric tracks and each track is further divided into sectors. A sector can hold a file or part of a file but cannot contain data from two or more different files. If only part of a sector is used for a part of a file the remainder is dead space until the sector is freed by deleting the file. In this way you can have a collection of files using up more space on the HDD than their total number of bytes because of the part sectors used.

Here you can see that the total amount of space used
by this set of files is 102Mb whereas the actual files total to only 101Mb.
This peculiarity is caused where you have partially full sectors and so
the empty space in the sectors is counted as used and is not available.
This usually occurs when you have lots of small files which occupy only part-sectors.

When the PC writes data to the HDD it does not necessarily write it in a contiguous space but may spread it all over the disc using up spare sectors, especially if the disc is quite full. There are tools for cleaning up data and this will be covered in another post.

You should always try to keep your data organized neatly on your PC and one measure which can help this is Disc Partitioning.

Disk partitioning is the act of dividing a hard disk drive into multiple logical storage units referred to as partitions, to treat one physical disk drive as if it were multiple disks. A partition editor software program can be used to create, resize, delete, and manipulate these partitions on the hard disk. An HDD may be partioned at any time using a partition editing application, even after years of use. You could split the HDD into two parts then move across the actual data into folders in the new partition and leave the OS and applications on the original partition. Once you have done this you may manipulate the sizes to suit.

I have downloaded Easus Partition Master Home Edition which is free to download and use for non-commercial use. With this you can create, delete, or resize partitions on the hard drive in your PC. It is particularly useful in a laptop as one generally only has one drive in that type of PC.

There are lots of technical pros and cons for dividing the HDD in a PC into more than one partition. The one outstanding advantage for me however is that if your operating system goes belly-up on a partioned disc, and you have to reload Windows, you only need to format the primary partition at installation time, and you do not lose your collection of data on any other partition you may have created.

When I partition an HDD in a laptop I allow enough room on the main partition, which will become the C: drive, for the OS and all applications which I intend to install. I never worry about losing applications such as MS Office, or Nero etc. as I have the installation media and can always re-install them after a crash. My data however may not have been backed up and if left on the C: drive it is vulnerable. For this reason I do not use the supplied libraries which are set up in Windows, My Documents My Pictures My Videos etc., but prefer to save all data onto either the second partition or an external drive.

The following graphic shows how my drive is partioned. The HDD in the laptop is a 500Gbyte drive and at set up I created a primary partition of about 100Gbyte and left the balance for data storage.

The single HDD in this laptop has been partitioned to allow
approximately 100GBytes for the OS and applications software,
and the balance forms another partition which
I use for data storage.

A word about disc sizes. Going back to basics in computing terms, 8 bits make a byte and for the sake of argument 1 byte stores 1 character of information. Originally a megabyte was actually 1024 bytes calculated in the old base 2 method. This led to confusion as mega in the scientific and mathematical world, means 1000 so by 2007, all the world standards bodies adopted the "mega = 1000" rule and HDD manufacturers strangely adopted this standard. So a megabyte = 1000 bytes, and a gigabyte = 1000 megabytes.

The result is that when you buy a 500Gbyte HDD you are actually buying 500x1000x1000 bytes (500,000,000) from the manufacturer. Confusion still exists because file management programs use the old base 2 standard where mega = 1024. Windows Explorer reports it as only 477 true Gbytes. Allow for other bits and pieces of system storage and you are left with about 450 true Gbytes of storage.


It is important to understand this because of the two standards in use. You are not being "done" when after installing and formatting a 1 Terabyte drive you have only 930 Megabytes of space available. This is the true figure to use, especially if you are using Windows Explorer to view your available disc space. (There is lots more detailed information about this to be found in Wikipedia).


-------------

Wednesday, 21 September 2011

6. Copy Pictures to an External Drive plus Drag and Drop instructions

I have been asked how to copy pictures to a USB flash drive, so I thought I’d explain the steps to take. Just before I do, though, I’ll clarify one quick point. Although the question was asking about pictures specifically, the steps don’t only apply to pictures – you can copy any files to a flash drive in exactly the same way, or even entire folders with everything they contain. In addition, these instructions could equally well apply to one of those large external discs of 500Gb or more which are so reasonably priced.

Right, let’s get started! The first thing to do is to plug in your flash drive. After a few seconds, you should see a little dialog asking what you want to do with this newly-arrived drive. Choose Open folder to view files, and a window will open displaying the contents of your flash drive (perhaps an empty window, if you flash drive doesn’t contain any files).

Leaving this window open, the next step is to open the folder containing your pictures (or, of course, whatever files you want to copy). Using Windows Explorer as described in the previous post, locate the folder containing the files you wish to copy.

At this point, then, you have two windows open – one showing the files you want to copy to the flash drive (among others, perhaps), and one showing the contents of your flash drive. It’s time to do some copying!

First, select one or more files to copy to the flash drive. Copying files one by one is fine – if a bit slow – but you can hold down the Ctrl key and click individual files until all the ones you want to copy are highlighted. Again this is described in the previous post. Now you have a choice of methods:

• Copy and Paste: press Ctrl+C to copy these files to the clipboard. You won’t notice anything happen at this point, but don’t worry about that. Switch to your flash drive’s window and press Ctrl+V, and the files will be copied to your flash drive and begin appearing in that window.

• Copy and Paste: right click on one of the files and choose Copy from the menu, right click in a blank area in the destination folder and choose Paste from the menu, and the files will begin to appear in the new location.

• Drag and Drop: drag one of the files you’ve selected over to a blank white space in your flash drive’s window and drop it there. This may not be as easy as I’ve made it sound (and we’ll return to this), but when you’ve done it, all the files you selected will be copied to the flash drive.

• Be careful when removing Flash drives to ensure that the files have actually copied to the drive. In earlier versions of Windows the files to be copied were only “flagged” for copying and were not copied immediately. If you pulled out the drive your data would not necessarily be there. In the System Tray on the Task Bar there is an icon which says “Safely remove hardware”. If you click on this it shows which removable hardware you have plugged in and allows you to indicate which one you are about to remove. When you then click on this any uncopied files are immediately copied to the drive allowing safe removal.


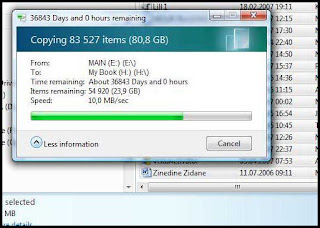
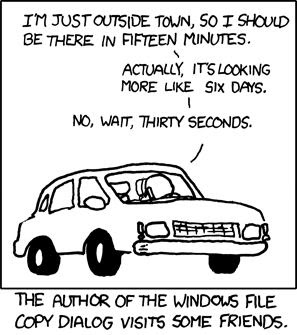
If you are copying a lot of files then this could take a long time. Windows will display a copy-icon which gives an estimate for how long the copy will take based on an average of the time taken so far. This time is notoriously inaccurate and may vary wildly whilst the copying is in progress.

Drag and Drop

This is an action which all experienced users use all the time to move or copy objects between folders and internal or external drives.

You can, as the term implies, click on a file and whilst holding down the primary mouse button (in most cases the left-button) drag the file to another location. Be careful because if the new location is on the same physical disc drive or partition, the file will actually be moved. I tell you this because you may not notice that it is moved and not simply copied, and then some time later you may miss the file if the other location has been deleted.

To give an example. I attend the Music Group meetings and I make up compilations from my collection of MP3s. To do this I create a new folder to contain the compilation, then drag and drop from the folders containing my original collection into the new folder. Once there the files are renamed to fall in line with the way the new collection is being numbered and named. Because the folders for the compilations are on the same drive as the original collection, if I simply dragged and dropped as described I would move my files and risk losing them.

Another way to drag and drop (and a much safer way) is to use the secondary mouse button, usually the right button, to drag the files. When they are then dropped in the new location a menu pops up asking whether you wish to move, copy, or cancel. In this way you have a second chance before it is too late.

-----------------

5. Windows Explorer

A file manager or file browser is a computer program that provides a user interface to work with file systems. The most common operations performed on files or groups of files are: create, open, edit, view, print, play, rename, move, copy, delete, search/find, and modify file attributes, properties and file permissions. Files are typically displayed in a hierarchy. Some file managers contain features inspired by web browsers, including forward and back navigational buttons.

Windows Explorer is a file manager application that is included with releases of the Microsoft Windows operating system from Windows 95 onwards. It provides a graphical user interface for accessing the file systems. It is also the component of the operating system that presents many user interface items on the monitor such as the taskbar and desktop. Controlling the computer is possible without Windows Explorer running (for example, the File | Run command in Task Manager on NT-derived versions of Windows will function without it, as will commands typed in a command prompt window). Located in the C:\Windows directory, it is sometimes referred to as the Windows Shell, explorer.exe, or simply “Explorer”.

You enter Windows Explorer by clicking on the icon on the task bar, or right click the start button and choose Windows Explorer, or right-click My Computer on the desktop and choose Explore.

While “Windows Explorer” is a term most commonly used to describe the file management aspect of the operating system, the Explorer process also houses the operating system’s search functionality and File Type associations (based on filename extensions), and is responsible for displaying the desktop icons, the Start Menu, the Taskbar, and the Control Panel. Collectively, these features are known as the Windows shell.

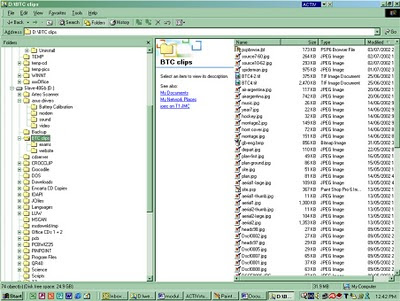
An example of the Windows Explorer view (click to enlarge it)

After a user logs in, the explorer process is created by userinit process. Userinit performs some initialization of the user environment (such as running the login script and applying group policies) and then looks in the registry at the Shell value and creates a process to run the system-defined shell - by default, Explorer.exe. Then Userinit exits. This is the reason why Explorer.exe is shown by various process explorers with no parent—its parent has exited.

It is very important to understand the basics of file management using Explorer. You can see from the graphics that your drives or USB sticks may be divided into folders and you should always do this yourselves to aid tidy storage and enable subsequent file location.

File management typically begins when saving a file which has been created within an application such as a word processing document or spreadsheet. When the time comes to save a file, your application will usually try to save in a System Library Folder named My Documents. This is prefectly acceptable but you should create folders within that to accept your documents and keep them tidy as discussed. When you have only a few files it may seem unnecessary but after some months or years you may have hundreds of documents and it will pay to both name them with realistic names (NOT letter1.doc, letter2.doc but letter to builder re extension.doc or household_expenses.xls etc.) and keep them in relevant folders.

For example, when storing picture files keep them in folders which indicate (say) the year you took them, then they could be further sub-divided into months, or people, or holidays, or events etc.

An example of a good use of folders to keep files tidy and easily locatable
(click to enlarge) this time in Windows XP


Other types of document such as music, films, spreadsheets and word processing documents should be stored in a similar manner.

In order to create a new folder, right click on a blank area in which you wish to create the folder, choose New, Folder. A new folder will appear and you then simply have to name it in line with what we have been discussing here.

In Windows, files are automatically associated with the program that creates them. This is achieved by Windows associating the file name extension (e.g. .doc) with the original program. Sometimes a file has to be manually associated with a program where for instance there is a choice of programs which could handle it e.g. Graphic files. You can double-click on a file to open it after the association is set up but it is better, however, to open a program first, then navigate to the file which requires to be opened.

Copying files may be necessary. If you try to copy a file with the same name from one location to another, such as from a memory stick to the hard drive, Windows will ask you if you want to overwrite the file on your hard drive with the file from the stick. If you choose to overwrite the file, it will replace the information in the existing file. This is final. You can no longer retrieve the original file.

If you want to keep both files, and on the same disk, you will need to rename one so that it has a unique name, or place it in a different folder as Windows will not allow two files with the same name to exist in the same place.

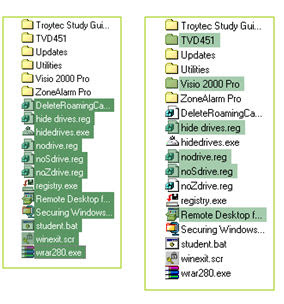
To copy/move a selection of files you may click on the first file, hold down the shift key and click on the last file in the list. This will highlight the two files you have chosen and all files in-between. Release the shift key.

Left, copying or moving files which are listed together,
Right, copying or moving files which are NOT listed together,

To copy/move a selection of files which are not listed together you may click on the first file, hold down the Ctrl key and then click on the other files you want. This will highlight individual files. Release the Ctrl key.

------------------


Friday, 16 September 2011

4. Why Does IE9 Keep Asking Me to Disable Add-ons?


If you use Internet Explorer 9, here’s something you may be puzzling over. Each time you start it, a yellow-edged box appears at the bottom of the Internet Explorer window saying ‘Speed up startup and browsing by disabling add-ons’.

An ‘add-on’ is a small program that adds extra features to Internet Explorer. They’re not programs you directly use yourself, so you won’t find them listed on your Start menu, but Internet Explorer loads them every time it starts. Many of these add-ons are extra toolbars that appear near the top of Internet Explorer: quite a few search engine companies (among others) make toolbar add-ons that are supposed to make web-searching easier, and you might well have a toolbar from Google, Ask.com, Yahoo! or Microsoft Bing. (Indeed, you might have ended up with several of these toolbars!)

There are also less-noticeable types of add-on – things that only make an appearance in particular circumstances. For instance, some add-ons play video files, and will only appear in web pages that contain one of those videos; Adobe Reader installs an Internet Explorer add-on that displays PDF files whenever you come across them on a website.

When you start Internet Explorer, and it goes through the process of loading all its add-ons, it keeps an eye on how long each add-on takes to load and start itself up. If the add-ons take a long time to start (well, more than a fifth of a second, which IE9 regards as quite long enough), that yellow-edged bar appears, suggesting that you might like to disable the add-ons that are persistently slow, which should improve Internet Explorer’s speed.

There’s another, less-obvious reason for this bar to appear: it’s to let you know that these added toolbars and other extras actually can be removed. Many users just accept that they seem to have extra rows of buttons and options in Internet Explorer that their friends and family don’t have, and even though they never use these bits and pieces, they don’t realise that they can be removed.

If this bar does appear, click the Disable add-ons button it presents and you’ll see a dialog listing all the add-ons that Internet Explorer has been loading. These are arranged in order of speed, with the ones that load most slowly at the top of the list. Each add-on has a ‘Disable’ button beside it: clicking that button tells IE9 to unload that particular add-on and not load it in future. Exactly what you do next depends on what you see in the list, but I’ll make two suggestions:

• First, disable the items at the top of the list which are taking a (comparatively) long time to start – anything over 0.02 of a second – by clicking the Disable buttons beside them.

• Second, have a look down the list for anything that seems unnecessary. Admittedly, you won’t necessarily know what all these add-ons are, which makes this step a bit tricky, but anything with the word ‘toolbar’ in its description is a good candidate for disabling: unless you actually use these toolbars, they’re just cluttering up the window.

Any changes you make here are reversible, so if you do find you’ve disabled a toolbar you actually use, you can enable it again. Click the little cog-shaped button at the right of Internet Explorer’s window, choose Manage add-ons, and you’ll see a slightly-different list of all add-ons, with a note beside each of whether it’s enabled or disabled. Find and click the one you disabled and want to get back again, then click the Enable button at the bottom of the dialog.

___________________

3. Editing Email Attachments – Why Do They Vanish?

Always be careful with Email Attachments. Do not open them unless you know the sender or are ABSOLUTELY sure of their source.

A friend had received a Microsoft Word document as an email attachment, and he double-clicked the attachment to open it. As expected, Microsoft Word opened and displayed the document. As he was reading through it, he made a few changes, added a few notes and, when he’d finished, he pressed Ctrl+S to save it and then closed Word.

He then realised he didn’t know where this document had been saved. He had a look in his ‘My Documents’ folder and it wasn’t there; he double-clicked the same email attachment again to reopen it, but all he saw was the original document with none of his own changes. So what happened to his edited version?

Well, it was indeed saved, but to a location he wouldn’t easily have found. When you double-click an email attachment to open it (any type of attachment – pictures, spreadsheets, text documents, you name it), your email program saves a copy of the attached file to a hidden folder on your PC and then tells Windows to open that copy of the file.

Assuming that all you want to do is read the document (or look at the picture), that’s not a problem. However, if you make changes to it and save it, you’re updating the copy of the file that was tucked away in that hidden folder – a file you’re not easily going to find!

So, how do you avoid this problem? There are two ways:

• If you haven’t yet double-clicked the attachment to open it, the best approach is not to do that. Instead, save the attachment to somewhere on your hard disk. If you right-click it, you should see an option labelled ‘Save As’ (or something very similar). Choose that option, and save the file to a location you can easily find, such as your Documents/My Documents folder or your desktop. You can then open that file, read it, edit it, and save it, and the changes you’ve made will be saved to that easily-locatable file.

• If you’ve already double-clicked the attachment and it’s open in front of you, the trick is not to press Ctrl+S to save it. Instead, choose File > Save As (or the equivalent in the program you’re using), so that you’re presented with the familiar dialog that asks where to save it and what to call it. You can then choose a logical place to save it (such as your Documents/My Documents folder) and click the Save button in the dialog. From this point, you’re working on a new copy of the document that’s been saved to that easily-found folder, so you can press Ctrl+S to save the document as you continue working on it.


_____________

Tuesday, 13 September 2011

2. Zip files

ZIP is a simple archive format that stores multiple files within one compressed file, called by Windows a Compressed Folder. The Zip operation allow a file to be compressed using many different methods (all of them completely transparrent to the user), as well as simply storing a file without compressing it. Each file is stored separately within the Zip file, allowing different files in the same ZIP to be compressed using different methods. A list of files is placed at the end of a ZIP file which identifies which files are in the ZIP and identifies where in the ZIP that file is located. This allows ZIP readers to load the list of files without reading the entire ZIP archive.

Techie bit over !!

There are many different applications for zipping or unzipping files, the original, now called Winzip, still being quite expensive, and most them are free. Windows itself will create Zipped files for you and an explanation of how to do this is given below.

My favourite archive reader/opener is the little known Zipeg, which is free to download and use although you can make a small contribution via PayPal if you wish. With this app you can open a Zip file and preview its content and then preview each file individually, handy if you don't need to extract all the files.

After downloading and installing Zipeg, you can associate it with some or all archive type files at installation time (simply choose all of them) so that in addition to ZIP files it will also read RAR files and other compressed archives.


Zip files are very useful for sending multiple files by email as you can add many fies to one archive and each will be compressed to its maximum. Be warned however that many files will not be compressed any more than they already are. Picture files in jpeg format are a good example as they will not compress. Text files and PDFs compress down quite nicely.

Once you have associated archive files with Zipeg it becomes automatic and any downloaded archive or one you have stored on your PC will prompt you to open it with the application. Zipeg may be configured such that it will automatically create a folder for the extract in a place of your choice.


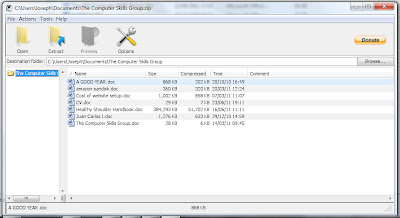
The above example shows a group of files which have been compressed into a zipped folder simply using Windows. To do this, enter Windows Explorer. highlight the files you wish to group together into a zipped folder, right-click on one of the files, choose Send-to from the menu, choose Compressed (zipped) folder and watch as Windows creates your Zip file, compressing the files as it goes. Windows will name the zipped file after one of the files it contains. If you look at the compression ratio in the above picture (click on it if it is too small to read) and you will note that some files have been compressed by over 75%.

This zipped file could then be emailed, saving time and costs especially if you or the recipients are not on Broadband.

Also note how the destination folder has been entered automatically by Zipeg but that this may be altered manually. I always choose to have the files extracted into a folder right next to the original archive. You will see and understand this more easily when you configure Zipeg, should you choose to use it.

-----------------

1. Photo enhancement


Ever since I discovered Paint Shop Pro as a free version on a cover-disk in the 80s I have manipulated photographs in order to enhance them. Sometimes it is removing people from backgrounds but can be taken to a high level and be used for removing scratches and marks from treasured photographs of relatives through to completely changing backgrounds in order to place people in a different environment.

Digital images on newer cameras may be altered quite easily and older printed photographs must be scanned before attempts at improvement may be made.

In my Computer Group (part of the Torrevieja U3A) we will be covering photo enhancement and this post is for demonstration purposes to show a few techniques.

1. Removing annoying or eye-catching backgrounds.

Click on any picture to view it full size.
Use the back-button to return


Here the image has been cropped, and the car and pavement rubbish has been removed. The groom has had two blemishes removed from his face.

2. Changing a background


In this photograph, the lovely couple standing by their flash car has been added to a picture from "Wind in the Willows". By no means perfect but an early experiment of mine.


Now the same lovely couple (somewhat older but just as lovely) have moved on to a swimming pool but the thin trees in the background allow a view through to the road and houses. Using "cloning" the trees have been spread to provide a more pleasing background and hide the cars etc.


My Great Niece, Grace, was photographed on holiday being given a bath in the kitchen sink in their caravan. I think removing her to a field of wild flowers makes a much more pleasing picture.

3. Repairing old and treasured photographs

Above is a badly damaged photograph of Sergeant Joseph Christie of the Eighth Army, taken circa 1942. Again not perfect but a vast improvement and a very acceptable enhanced image.

A friend of mine was doing his family tree and asked if I could improve this picture of his Grandfather. Mainly using cloning, the scratches, creases, and spots have been removed and left a very good new image. A photograph like this could take about three hours to improve to the extent shown above. The sepia tone has been kept to maintain the "age" of the photograph.

I hope to demonstrate these techniques in future weeks.


-----------------