 I have been asked how to copy pictures to a USB flash drive, so I thought I’d explain the steps to take. Just before I do, though, I’ll clarify one quick point. Although the question was asking about pictures specifically, the steps don’t only apply to pictures – you can copy any files to a flash drive in exactly the same way, or even entire folders with everything they contain. In addition, these instructions could equally well apply to one of those large external discs of 500Gb or more which are so reasonably priced.
Right, let’s get started! The first thing to do is to plug in your flash drive. After a few seconds, you should see a little dialog asking what you want to do with this newly-arrived drive. Choose Open folder to view files, and a window will open displaying the contents of your flash drive (perhaps an empty window, if you flash drive doesn’t contain any files).
Leaving this window open, the next step is to open the folder containing your pictures (or, of course, whatever files you want to copy). Using Windows Explorer as described in the previous post, locate the folder containing the files you wish to copy.
At this point, then, you have two windows open – one showing the files you want to copy to the flash drive (among others, perhaps), and one showing the contents of your flash drive. It’s time to do some copying!
First, select one or more files to copy to the flash drive. Copying files one by one is fine – if a bit slow – but you can hold down the Ctrl key and click individual files until all the ones you want to copy are highlighted. Again this is described in the previous post. Now you have a choice of methods:
• Copy and Paste: press Ctrl+C to copy these files to the clipboard. You won’t notice anything happen at this point, but don’t worry about that. Switch to your flash drive’s window and press Ctrl+V, and the files will be copied to your flash drive and begin appearing in that window.
• Copy and Paste: right click on one of the files and choose Copy from the menu, right click in a blank area in the destination folder and choose Paste from the menu, and the files will begin to appear in the new location.
• Drag and Drop: drag one of the files you’ve selected over to a blank white space in your flash drive’s window and drop it there. This may not be as easy as I’ve made it sound (and we’ll return to this), but when you’ve done it, all the files you selected will be copied to the flash drive.
• Be careful when removing Flash drives to ensure that the files have actually copied to the drive. In earlier versions of Windows the files to be copied were only “flagged” for copying and were not copied immediately. If you pulled out the drive your data would not necessarily be there. In the System Tray on the Task Bar there is an icon which says “Safely remove hardware”. If you click on this it shows which removable hardware you have plugged in and allows you to indicate which one you are about to remove. When you then click on this any uncopied files are immediately copied to the drive allowing safe removal.

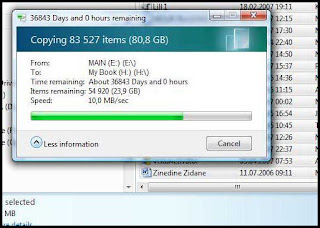
If you are copying a lot of files then this could take a long time. Windows will display a copy-icon which gives an estimate for how long the copy will take based on an average of the time taken so far. This time is notoriously inaccurate and may vary wildly whilst the copying is in progress.
Drag and Drop
This is an action which all experienced users use all the time to move or copy objects between folders and internal or external drives.
You can, as the term implies, click on a file and whilst holding down the primary mouse button (in most cases the left-button) drag the file to another location. Be careful because if the new location is on the same physical disc drive or partition, the file will actually be moved. I tell you this because you may not notice that it is moved and not simply copied, and then some time later you may miss the file if the other location has been deleted.
To give an example. I attend the Music Group meetings and I make up compilations from my collection of MP3s. To do this I create a new folder to contain the compilation, then drag and drop from the folders containing my original collection into the new folder. Once there the files are renamed to fall in line with the way the new collection is being numbered and named. Because the folders for the compilations are on the same drive as the original collection, if I simply dragged and dropped as described I would move my files and risk losing them.
Another way to drag and drop (and a much safer way) is to use the secondary mouse button, usually the right button, to drag the files. When they are then dropped in the new location a menu pops up asking whether you wish to move, copy, or cancel. In this way you have a second chance before it is too late.
-----------------